Edited by VeldrinDid you?Have anyone actually sent this question to FFG?
Dauntless stress timing question
Personally I don't see the reason to get this clarified in the FAQ - as the steps in the Activation Phase and the way the cards interact with those steps are pretty cut and dry.
Edited by KeffischPersonally I don't see the reason to get this clarified in the FAQ - as the steps in the Activation Phase and the way the cards interact with those steps are pretty cut and dry.
I agree, but a lot of people will probably find it difficult to believe that a green maneuver (which was made before the Dauntless induced action took place) can remove the stress generated by Dauntless.
Personally I don't see the reason to get this clarified in the FAQ - as the steps in the Activation Phase and the way the cards interact with those steps are pretty cut and dry.
I agree, but a lot of people will probably find it difficult to believe that a green maneuver (which was made before the Dauntless induced action took place) can remove the stress generated by Dauntless.
Those same people would likely also believe that they could Dauntless while stressed, if they made a green maneuver.
I think an FAQ entry would be nice, sort of like how Imperial Boba Fett has a point that merely clarifies how he and Navigator do in fact work.
Honestly I would prefer to let dauntless just not skip your action phase.
So let me get this straight... I take Captain Oicunn, Ysanne Isard, Dauntless and Experimental Interface, when I perform a green manoeuvre that overlaps an enemy ship(I give that ship a damage card) then I perform a free action(target lock) and receive a stress token, then because of my green manoeuvre I lose the stress token and take a normal action(focus), then at the start of the combat phase Ysanne kicks in and I get a free evade action which kicks in the Experimental Interface which allows me to perform the action on my Expose card? That is crazy!
Mostly. If you overlap during your maneuver, you skip your Perform Action step; in your example, you wouldn't be able to focus. Also, you don't deal damage upon overlapping, you have to reverse your ship along the template first, and then anything you are touching receives one damage. But then yeah, Isard and Experimental Interface plus Expose work just like you said!
Cheers, forgot the overlap/miss action bit in all the confusion.
Cheers, forgot the overlap/miss action bit in all the confusion.
No worries! It's a long string of actions and exemptions, and that's sort of why I'd like to see an FAQ entry for it.
I think an FAQ entry would be nice, sort of like how Imperial Boba Fett has a point that merely clarifies how he and Navigator do in fact work.
There was actually a lot of unclear rules surrounding Fettigator, with most of the terms and timing completely undefined. We honestly still don't know exactly WHY it works, just that it does.
This is completely different. Every element of this particular interaction is perfectly well defined and supported by either the core rules or other rulings such as Night Beast. Sending off for a clarification is not "I don't know how this works, please help", it's "I don't like how this works, please help."
No relation to the Fettigator at all.
I'd disagree with all of that, actually. Fett and Navigator both trigger off the same thing, and you're allowed to initiate both in whichever order you choose, you're just forbidden from triggering then more than once per opportunity. The order doesn't actually matter, either, so long as both are valid when you go to proc them. Fett keeps speed but swaps bearing; Navigator swaps speed but keeps bearing. The salient point they highlight in the FAQ is that if Fettigator reveals a bank, you can rotate to any of the six bank maneuvers available to him.
You're right, that the effects at work with Dauntless are clarified in the rules and FAQ, but I don't understand where anyone has claimed they don't like that it works. I would still rather see it in the FAQ, so that new or newly-competitive players don't have to hunt up each particular rule or timing clarification on their own; same as Fettigator, a single sentence or two in the FAQ can make things a whole lot more straightforward and inclusive.
I aksed FFG and Frank Brooks got back to me after I and the son had finished an Imperial Assault mission (so, in less than two hours).
He confirmed that the green maneuver does indeed remove the Stress from Dauntless.
Edited by VeldrinI'd disagree with all of that, actually. Fett and Navigator both trigger off the same thing, and you're allowed to initiate both in whichever order you choose, you're just forbidden from triggering then more than once per opportunity. The order doesn't actually matter, either, so long as both are valid when you go to proc them. Fett keeps speed but swaps bearing; Navigator swaps speed but keeps bearing. The salient point they highlight in the FAQ is that if Fettigator reveals a bank, you can rotate to any of the six bank maneuvers available to him.
An impressive explanation that hits the obvious points while completely glossing over the unknowns.
Yes, the fact that you can do it is solid. We still don't know if that's because both effects trigger off the reveal but act on what is showing when they resolve (not supported in the rules) or if rotating to a new maneuver counts as revealing it (also not supported in the rules). And even if you think it's clear now, it most certainly was not when Navigator first hit, and the strong consensus was that it didn't work.
But I'm not really interested in getting into a deep relitigation of Fettigator or the bad wording surrounding it. Veldrin got the response, Dauntless into a green is confirmed.
WAIT WAIT WAIT, I thought you cleared stress when you revealed a green maneuver. So you can't move green bump, get a stress and then clear that same stress.
Yet another trick you can do with Dauntless worded this way:
Fly onto/across an asteroid on your way to collide with another ship. Use Dauntless to act anyway -- possibly boosting/barrel rolling/daredeviling off the asteroid so you can still shoot. (Dash is not a unique snowflake.)
Edited by QuarrelWAIT WAIT WAIT, I thought you cleared stress when you revealed a green maneuver. So you can't move green bump, get a stress and then clear that same stress.
The phase order goes:
1. Reveal your maneuver
2. Perform your maneuver
3. Adjust your stress based on maneuver color
4. Take an action
Dauntless's entire effect happens between #2 and #3. It's actually pretty simple.
WAIT WAIT WAIT, I thought you cleared stress when you revealed a green maneuver. So you can't move green bump, get a stress and then clear that same stress.
The phase order goes:
1. Reveal your maneuver
2. Perform your maneuver
3. Adjust your stress based on maneuver color
4. Take an action
Dauntless's entire effect happens between #2 and #3. It's actually pretty simple.
Couple of minor quibble here - The steps you list there are actually 1, 3, 4, and 6. Dauntless triggers as part of Step 3 (Execute the maneuver), not between the steps. But otherwise, the general idea is correct.
The normal gain/lose stress check is not actually a reaction to the maneuver - it's a completely separate step in the Activation phase, which looks back on what the difficulty of the maneuver was that you executed. Other effects can and do trigger off that maneuver, and resolve immediately, still during Step 3 and hence before you reach the point when you'd check for stress.
I just realized that the original wording for Daredevil wouldn't have generated a stress a token. It being a red maneuver would only have prevented you from executing it if you were already stressed and caused things like Minor Hulls Breach to kick in. It's kind of a shame that they changed it. It would probably see a lot more use (but would become worthless for Tycho).
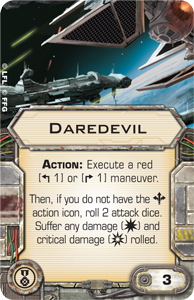
I just realized that the original wording for Daredevil wouldn't have generated a stress a token. It being a red maneuver would only have prevented you from executing it if you were already stressed and caused things like Minor Hulls Breach to kick in. It's kind of a shame that they changed it.
I suppose they changed it because the original wording did not cause stress.
Would it be obtuse of me to ask why people are flying in such a way as to let a Decimator hit them?
Would it be obtuse of me to ask why people are flying in such a way as to let a Decimator hit them?
No, it would not.
Getting overlapped is not bad. Unless it's by Oicunn. He suggests you fly elsewhere. Which is valuable.
and for those of you looking for a cost ...
There's both the point cost, and the cost of performing an overlap, which is sometimes not so easy.
This is why I'm going to run Chiraneau with Dauntless and Navigator: to deny an opponent an attack on my ship at no particular cost to myself.
Interesting topic. Quick question;
Say I have Oicunn+dauntless+Expert handling+EI ram into another ship, could I use the free action to take a TL, then trigger EI to barrel roll so that I'm no longer touching and most likely have a range 1 shot on the ship I was previously overlapping?
Interesting topic. Quick question;
Say I have Oicunn+dauntless+Expert handling+EI ram into another ship, could I use the free action to take a TL, then trigger EI to barrel roll so that I'm no longer touching and most likely have a range 1 shot on the ship I was previously overlapping?
Yep, although you'd end up with two stress for it.
If he had a way to clear those 2 stress immediately, Yorr for example, would he then be allowed to take an action in his perform action step?
edit: Thinking about it, probably not. He still overlapped someone with his maneuver and would therefore skip the perform action step, even if he is no longer touching when the step actually happens.
Edited by ForgottenloreYep, although you'd end up with two stress for it.Interesting topic. Quick question;
Say I have Oicunn+dauntless+Expert handling+EI ram into another ship, could I use the free action to take a TL, then trigger EI to barrel roll so that I'm no longer touching and most likely have a range 1 shot on the ship I was previously overlapping?
How is this possible? Normally one may not perform an action when stressed,not even free actions. So if stressed from Dauntless then you wouldn't ba able to use EI, or am I missing something? And before any storm of berating begins let me say that I am no expert in these intricate timing issues in which so many are so excellent