Getting Started: Airbrushing 90 - What Do You Need to get Started

By sc077y, in X-Wing

I have 5 airbrushes, each with a particular purpose. ill run you through what i use and why, but understand that its my opinion and I’m sure others will give you equally effective advice.

I am an experienced airbrusher, and have produced some good results (bear in mind I have no artistic talent) with some basic techniques. I have been "shooting" for a few years and really enjoy the hobby, just remember, my input is by no means final or definitive. Others have wonderful feedback and all should be considered. There are many people on here who can easily blast me into dust with their talent and their ability, so this is designed to help get the novice started.

In terms of airbrushing, lets talk about everything ELSE you need first, and then lets talk brushes. Here is a list of things you need to consider.

Air supply - while not just a cheesy 80's band, its also the second most important consideration in your airbrushes, and maybe the first. In the world of air pressure, compressors come in a variety of build types and i'll throw my .02 in below.

Tankless airbrush (silent) compressors - The recommendations here vary, but most will say that a standard tankless compressor is typically sub-par. A compressor without a tank has to constantly run to provide air pressure, and that makes them far more prone to wear down and breakage quickly after a few years of use. Additionally, they typically cant handle high pressure ( over 35 PSI, which on a double action airbrush is almost never used, but on a syphon fed airbrush, shooting at 40 or even 50 PSI is routine to get large jobs done). Additionally, because there is no tank, the air pressure is not constant, and can create "pulsation" in the air stream, which can create splatters and inconsistent spray patterns. in all, while they may be silent, they aren’t a wonderful choice, but rather a clutch choice if no other option presents itself.

Traditional high-pressure air compressor - A compressor with a tank is a better way to go, but if you get a traditional compressor, like for a garage, the noise level can be a big problem. Also, you may end up buying extras for the compressor, like an additional pressure regulator that can regulate pressure down to the levels that air brushes use, (typically very low, around 20psi), adapters, hoses, and fittings. That means that the high pressure air compressor, that is noisy as hell, that you purchased to save a few bucks on you didn't save that much money on, making it a less attractive options.

Airbrush compressors with a tank - While the most pricey, these compressors are typically "silent" (it should be noted that they aren’t silent at all, they just sound about as loud as a noisy box fan or a dryer during laundry time) but often offer a tank to hold air, so the compressor doesn't have to run all the time, and provides a consistent air stream so there are no pulses in the air stream. The only downside to these air compressors are they comparatively, they are a little more expensive, clocking in often at the 125-300 dollar range depending on what you’re purchasing. I have been using a Global Direct TC-20T for a while now (just under 3 years) and it does a good job. Just be sure when your searching, you look for a TC-20T, because the "T" on the end designates the 1/3 gallon tank feature. They do make a standard TC-20 without a tank, and I wouldn’t own it.

The next thing you will need is a place to use your new equipment. If you intend to use your airbrush inside, a spray booth is almost a necessity. Get a spray booth with an air filter and a fan, with a duct to blow the waste outside is a great place to protect your family and friends, as well as pets in the house. On that note, you will also need a respirator mask, so you don’t end up breathing in all the by-product of the airbrush. Remember, acrylic paint may be non-toxic, but that doesn’t mean it still isn’t dangerous to breathe in, and the cleaning agents you spray through the airbrush are toxic or can be, so make sure you follow safety precautions.

The next thing to make sure that you keep in mind is what you are going to shoot through the airbrush. Vallejo and Badger both make wonderful sets of paints pre thinned for use in most airbrushes, and I actually prefer badger paints (thanks Lester Bursley!) to Vallejo, but both are amazing. Additionally, it’s a good idea to get a matte finish, and some basic colors of inks to give your models depth. Additionally, Flow-Aid, Dillutant, and Drying Retarder from Flow Aid are also highly recommended, as you will use them to create a mixture to add to the paint to help keep it from building up on the tip of your airbrush as often, and to allow you to dilute paints that aren’t flowing as smoothly through the airbrush as you like. For more information on this, I highly recommend checking out APJ (awesome paint job)’s youtube channel, as well as schnauzerface minis youtube channel.

You are also going to need something to clean your airbrush with, and I recommend badger airbrush cleaner, and Regdab (badger spelt backwards) needle juice, as its basically airbrush oil and will lubricate the internals of your airbrush, as well as also help prevent paint from building up on the tip of the airbrush. (This is commonly called tip dry, and when that happens, you need to stop and clear the tip of your airbrush, otherwise, paint wont come out, as its clogged and blocked off.)

In terms of the air brush itself; I have 5, and ill walk you through what I own and why I own them.

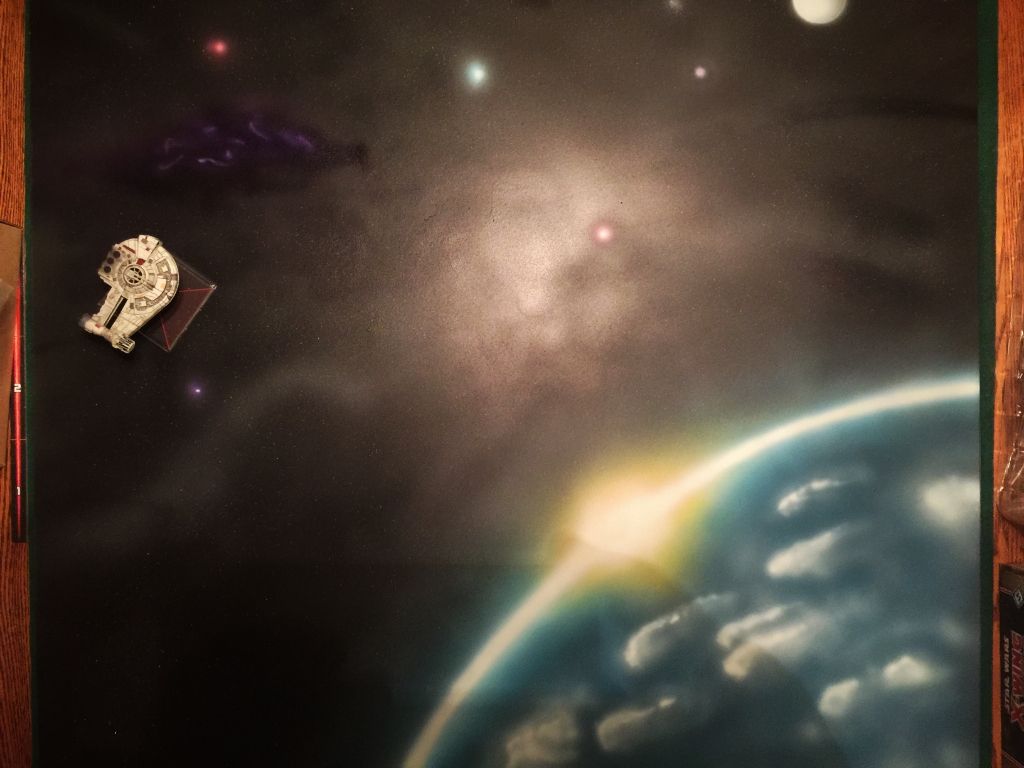
Badger 200NH - this is a syphon fed (has the bottle underneath) and single action (meaning that the trigger has only one function, to push air pressure through the brush. A double action airbrush allows you to control the amount of paint pushed into the airbrush in addition to pushing air pressure through it.) This brush handles large jobs, like base coating a play board all black. it has a large needle and can disperse paint in an 8" pattern from about a foot away. Basically, it covers a lot of area very quickly, and with a bottle adapter, you can cover a large area without having to constantly reload and refill the airbrush. With it, you can easily cover big projects, like game boards base coats and large areas. In the below picture, i used the 200NH to coat the board (after preparation) with the black base coat and the basic outline of the planet in the corner.

3220eb82-4f53-421b-b5fa-8ab0c214e55d_zps

Iwata eclipse - this is my oldest airbrush, and my most hated. I know many people love iwata, but for me, its an overpriced airbrush that does the job well, but is very costly to maintain under normal wear and tear, that’s why this brush is a back up for me.

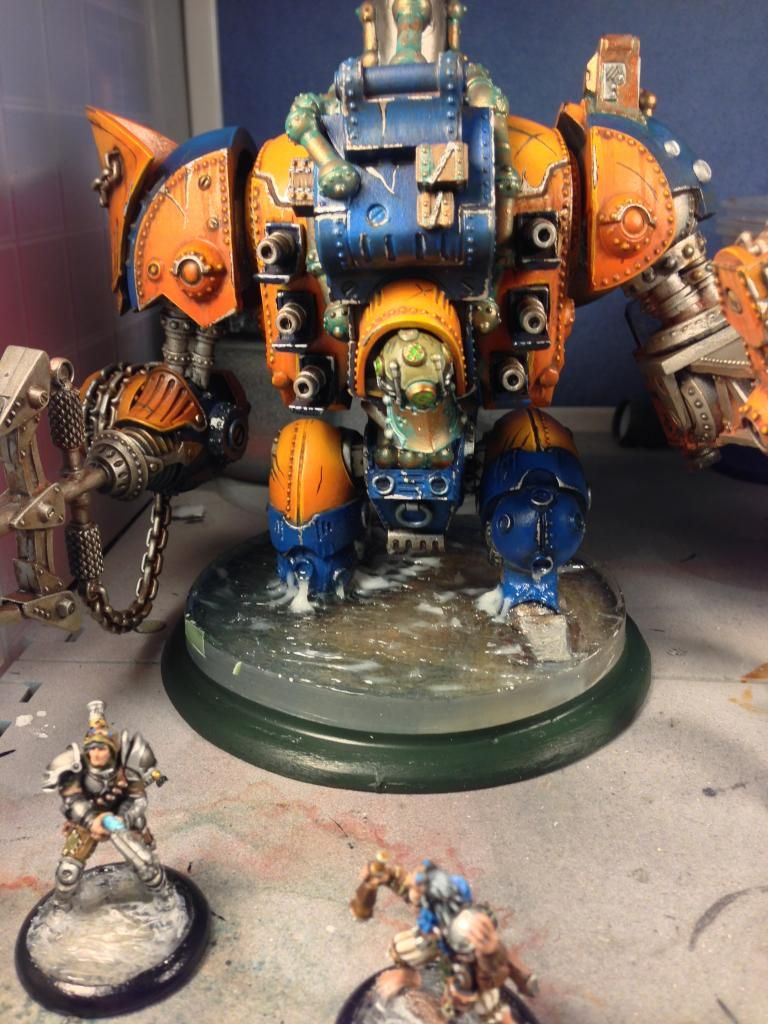
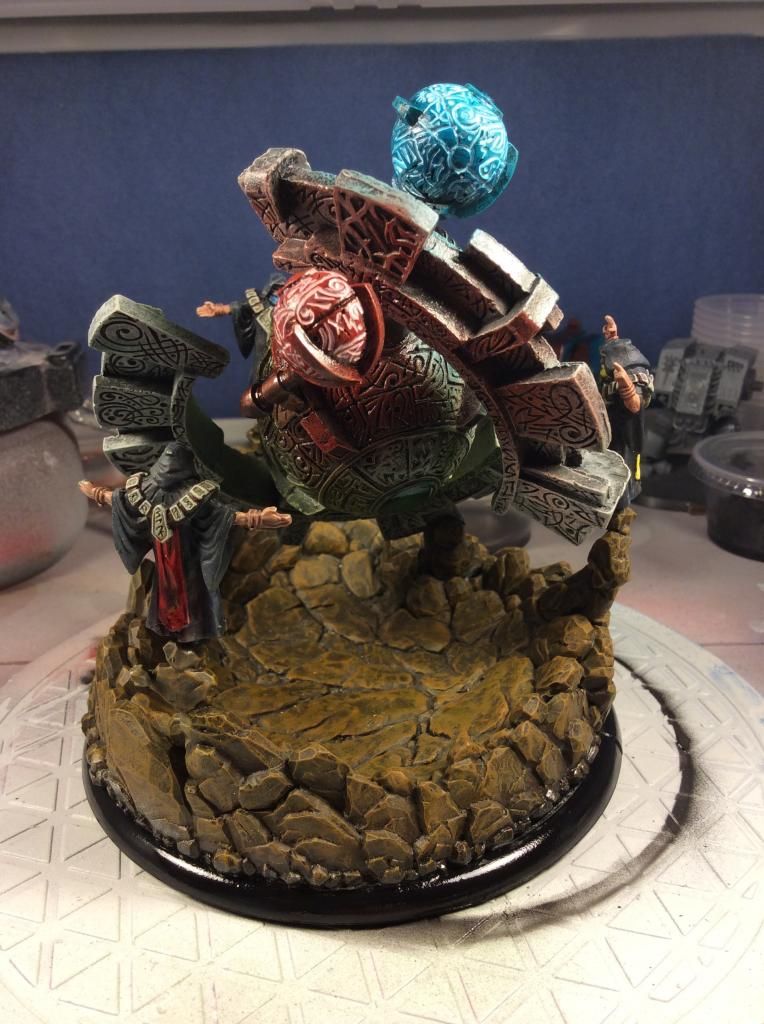
Paasche Talon G3 - this brush shoots paint with a lot of different capabilities and has a very small ultra fine needle for details. i got it mainly as a medium detail brush that can run fine detail at very low air pressure, but is also versatile enough to have a fan nozzle, and a large needle with a large gravity fed cup to allow moderate to large scale projects with minimal refilling. my complaints with this brush are that its just cheap. the trigger is spongy, and not very crisp, and the rear of the airbrush is made of plastic, which is frustrating and a surprising cheap cost design that unbalances the airbrush. outside of those complaints, i use it often enough, and it does work very and is a great airbrush for beginners because its double action, gravity fed, cheap to maintain (paasche parts are dirt cheap, like 6.00 for needles and airbrush heads and really cheap replacement parts in general), lower cost, and has an ultra fine, fine, medium, and large spray pattern heads available (i think all but the large come with it in the box) and even has a fan nozzle, so you can spray wide patterns in a flat line, making covering large areas (like a game board) easier and simple. its a good brush for the money. I used the Paasche Talong G3 to do most of the detail work on this Stormwall model from Privateer Press:

IMG_0923_zps4fd60a5c.jpg

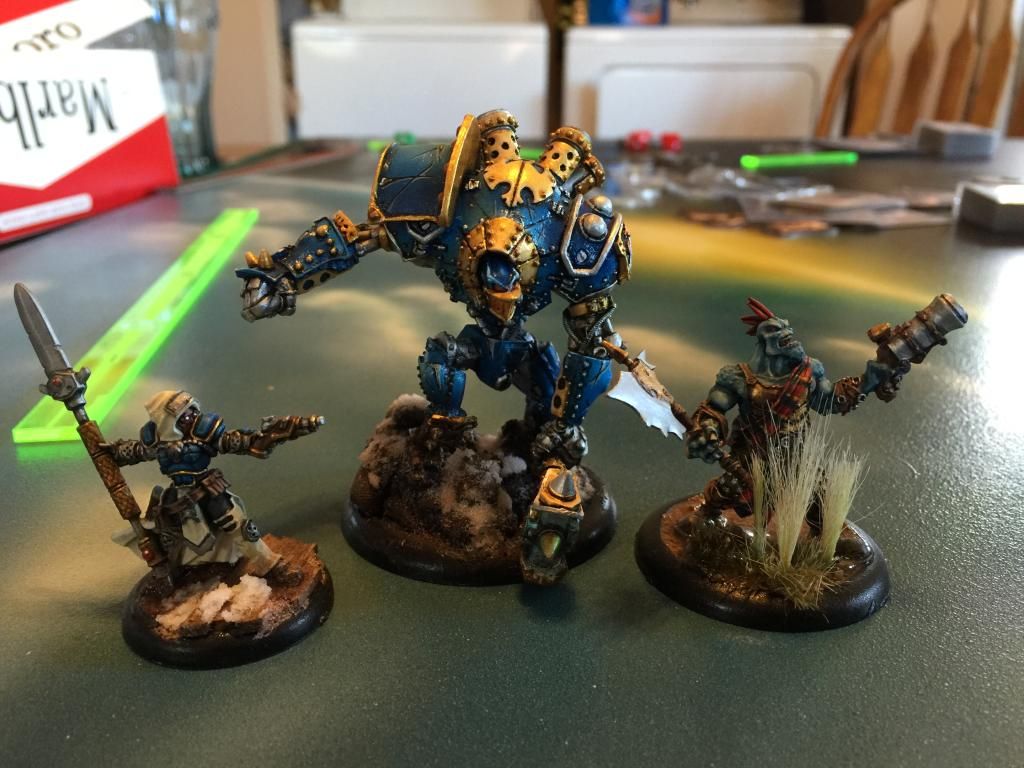
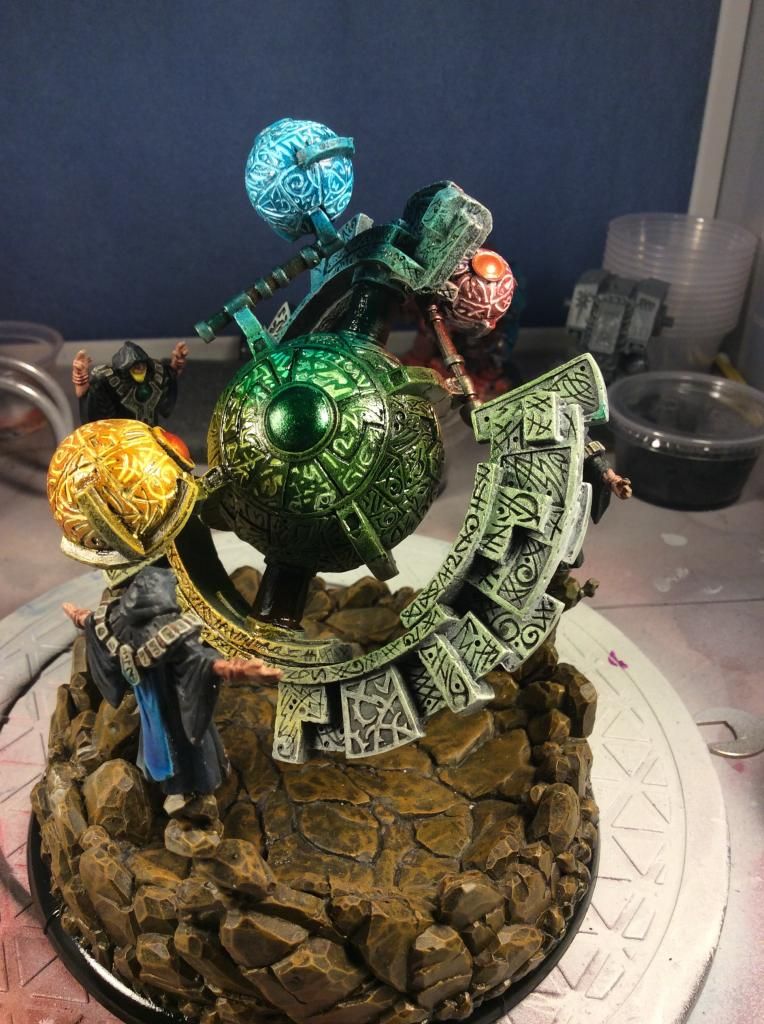
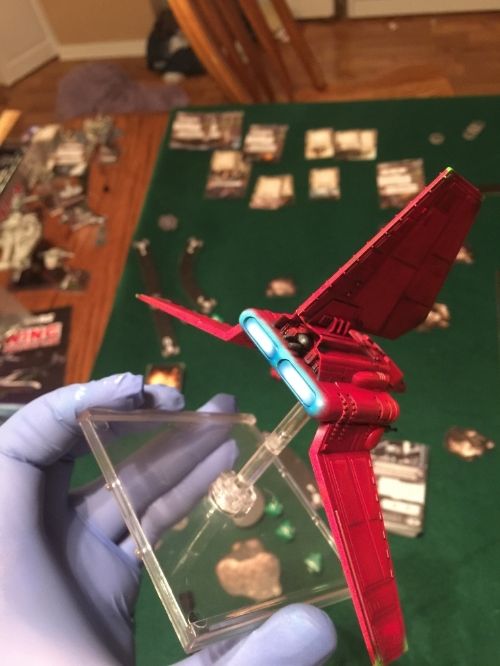
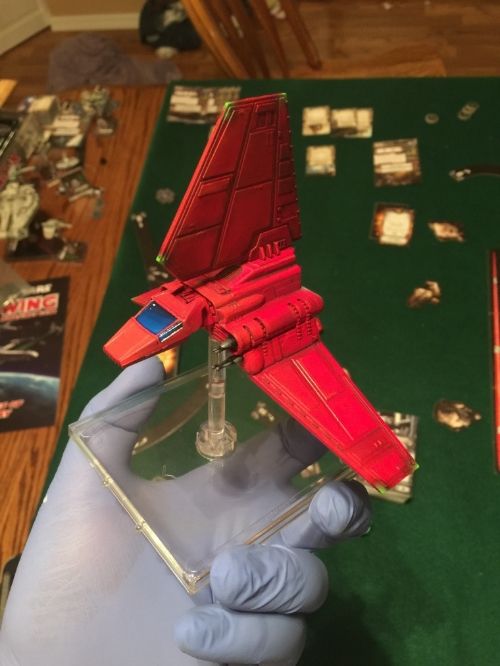
Badger SOTAR 20/20S - this is a really good airbrush, and by far my personal favorite. the SOTAR stands for "State of the art results" and it means it. This brush will go toe to toe with any harder and steinbeck, or grex, or iwata eclipse III brushes on the market. I am a big fan of Badger in general, because they are american made, and all parts are american made, and ken schoefield, the CEO, is one of the coolest dudes i have ever got the pleasure of meeting and working with. The SOTAR is designed as an illustrators brush however, and that comes with some drawbacks. This brush runs low air pressure extremely well, and will create pencil line thin lines very easily, however, the paint it shoots has to be extremely thinned down, even "Air brush ready" paints will need to be thinned for optimal results, and that means that it takes a lot more "fidgeting" to get it to really work for you. once you get it dialed in, this brush is absolutely bad ass, and will get an amazing amount of work done. In terms of technicalities, this brush is a double action gravity fed, and the "S" model has a super small cup on top (the paint reservoir is commonly called a cup on gravity fed brushes) capable of only holding three or four drops of paint, while the "F" variant has a more traditional sized cup on top for slightly larger jobs. I used the Badger SOTAR 20/20F to provide the details and light sourcing on this Celestial Fulcrum model, once again from Privateer Press

IMG_0033_zpsffb12edd.jpg

IMG_0035_zpsae3fb5f5.jpg

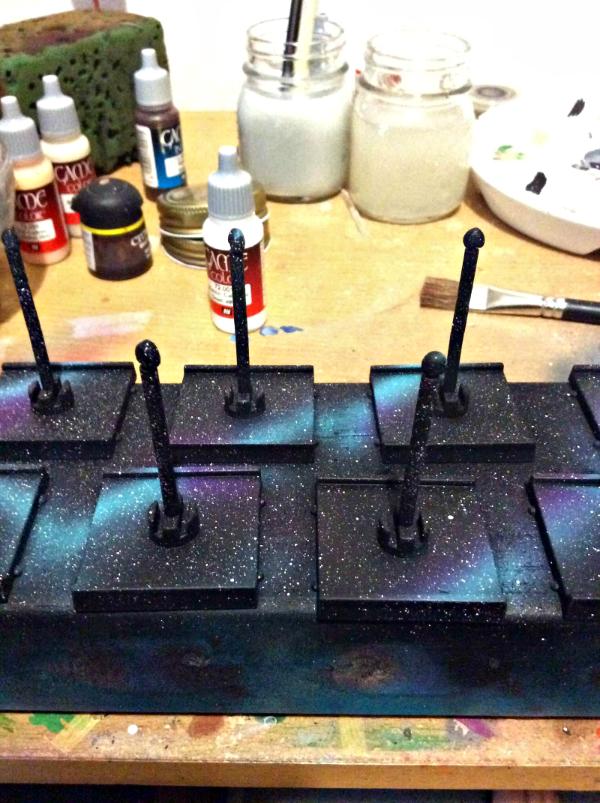
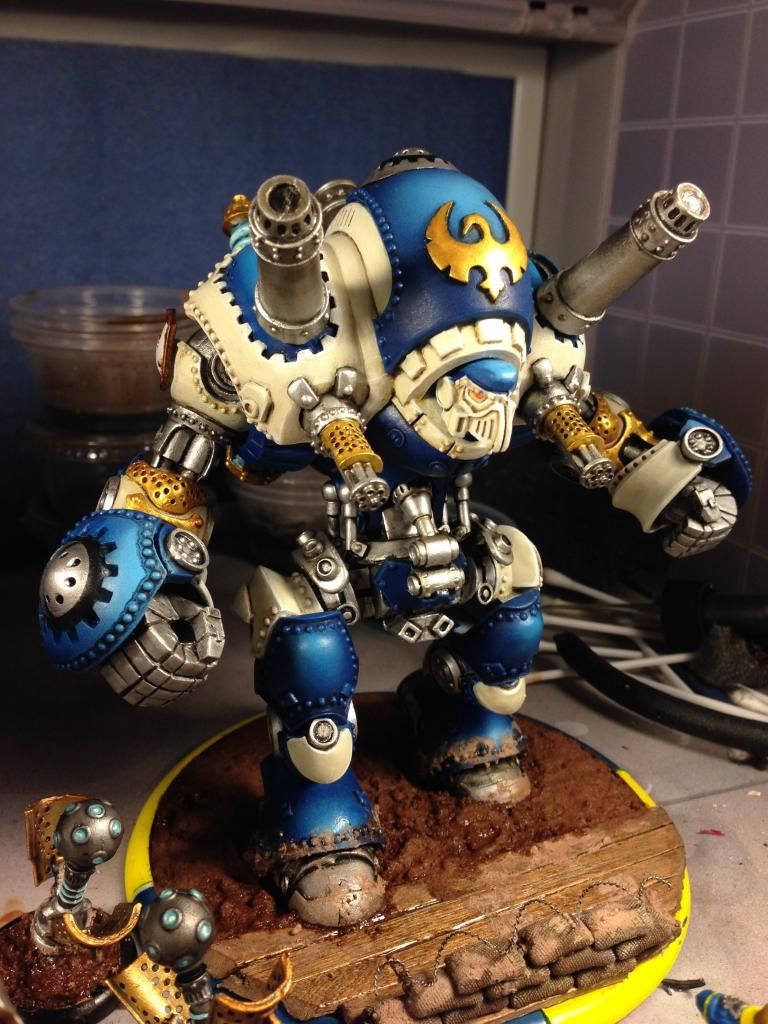
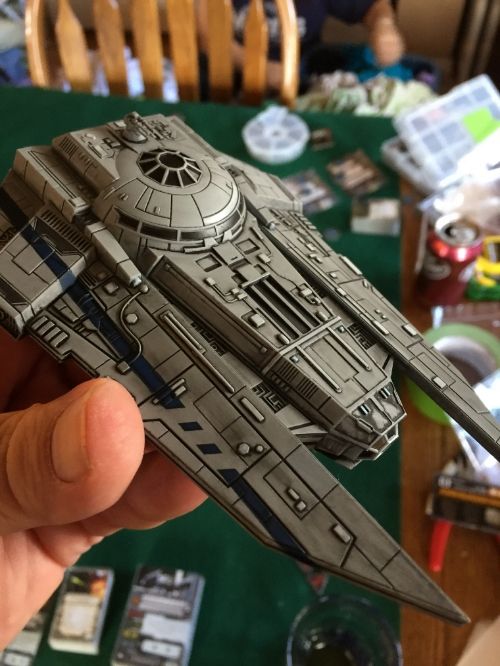
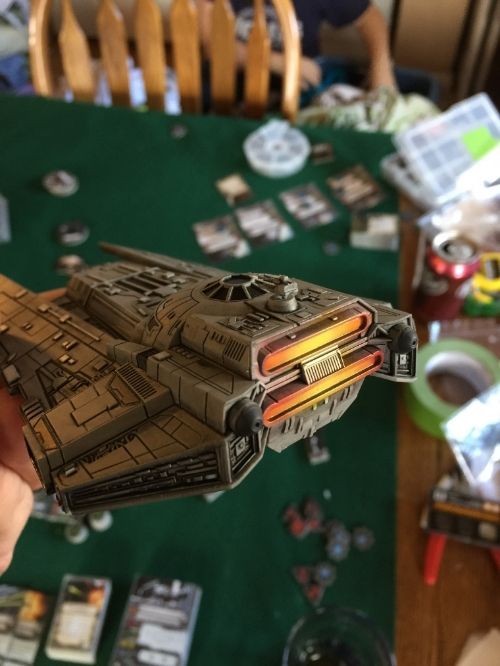
Badger Renegade Krome - This is my newest brush, and my second favorite airbrush, and the workhorse of the fleet. This brush is all steele, making it big and heavy. Its loaded with options, and has the same needle design of the SOTAR meaning it can produce the definition that the SOTAR can, but its study construction and larger cup make it the brush i lean on the most. Gravity Fed, and a wonderfully smooth trigger like the sotar (which is adjustable for tension) means this brush shoots extremely well. What it doesnt do as well as my sotar is shoot low pressure as well. Bear in mind, the thinner the paint, the lower the air pressure to prevent splattering and the Krome doesnt fair as well here. What the Krome does really well is shoot airbrush ready paint almost flawlessly, because it does handle higher air pressures more easily and seems to keep the paint moving really well. I used the Krome to do the pin striping because of its extremely consistent spray patter, and its ability to hold a lot of paint in the cup at one time, makes things like engines and pin striping easier to do. I used it on my Lambda and Devestator:

9C68E49D-DED0-4B80-AEF4-8BBCD57A6520_zps

5211FF5E-816F-4DBB-9485-4D88D8DDF361_zps

7c72157b-d776-4c3c-a946-08bacef4e188_zps

a077570e-4374-46bb-a317-e0539fbcf9af_zps

The last thing ill give you is a few points that I learned over time. The first is don’t buy a cheap airbrush because its cheap. Buy an airbrush that will work for your intended purposes. If you aren’t sure where to start, the Badger Patriot 105 is probably the best bang for the buck you can possibly get. Around 100 to 150 bucks, you can get needles from ultra fine to large, and it handles all kinds of pressure pretty well, making it wonderful for the beginner, and it will grow with you as you become more advanced. I have helped many friends get started, and every time I have recommended the Patriot 105 from Badger, and every time, they have loved it and continue to use those 105s today. I can’t recommend enough, that you start with this airbrush. Some will say to start cheap, and there is logical sense in that, but I will always recommend starting with a low cost, but very good product. The patriot 105 fits the bill.

The second point I have learned is to invest in cleaning products. Badger airbrush cleaner, or Vallejo (the only reason I don’t recommend Vallejo is because its more expensive, its one hell of a cleaner) to get your brush clean. Do not use brushes or cleaning pads on your airbrush. Clean it by shooting the cleaner through it until its clean when it sprays out. Once you’re done with the brush for a full session, then take the needle out, the nozzle apart, and put it in an ultrasonic cleaner in a solution of simple green and water (about 50/50) and let it do the trick. If you don’t have an ultrasonic cleaner in your home already, you can get them on amazon for about 30 bucks.

The last point is highly caution against using windex or other ammonia based cleaners through your airbrush. Amonia wont hurt a badger airbrush, because they are all metal and don’t use plastic or rubber seals, but ammonia will break down the seals used by other companies and might cause problems later on. Additionally, I DO NOT want to breathe in atomized ammonia when cleaning my airbrush.

I hope this extremely long document helps. There are great sources to use, and if you have questions, you can always PM me or just reply to this thread, im more than happy to help.

Airbrushing is a hell of a lot of fun, and if you want to get into it, you will produce stunning results in no time. Even I have won a few awards for this guy:

IMG_0916_zps7e428db7.jpg

Edited by sc077y

Great thread, really helpful. Only downside is that the Badger stuff is impossible to find easily in the UK, so I'm probably going to have to go with an Iwata Revolution CR unless you can give me a pressing reason not to? I've just bought a tank compressor with moisture trap etc that comes with 1x dual action siphon fed and 1x dual action side loading gravity feed chinese rip offs, which are probably going to be good for large coverage and not a huge amount else. If you could answer a couple of (admittedly simple) questions, I'd really appreciate it. :)

1. What kind of needle size produces what kind of result? Obviously it varies with distance from the model, but for working on X-Wing stuff, what size would you recommend?

2. If you're using a mask (and I will be), how essential is a booth for indoor work? Obviously you need something for catching paint overspray, but in terms of ventilation do you actually need an active fan system if you're in a large room with a window + door open plus a mask?

3. Provided you clean your brush after every use, whenever you change colours, or just every 5 minutes or so, how essential is the ultrasonic cleaner? I don't really want more clutter than absolutely necessary on my already overcrowded desk, and it seems like something that people use for "caked on" paint, which obviously shouldn't happen if you clean regularly to begin with.

Thanks for your time!

In my old work shop I had a mini booth that I constructed from a re-purposed bathroom cabinet and exhaust vent.

Using a small lavatory exhaust lamp and aluminum ventilation hose:
36654bef320eed3204ac3d017cfef4f4.jpg

It provided a good source of light and helped pull some of the fumes.

I placed that in the top of an old vanity, looked very much like this one:
photo-rustic-brown-bathroom-vanities.jpg

...the back side was open. I used a couple table legs, mounted to the base, that gave it enough height to use a regular chair. Just placed a lazy susan inside to allow me to rotate my subject and some heavy vinyl sheeting over the opening to protect from dust.

Great thread, really helpful. Only downside is that the Badger stuff is impossible to find easily in the UK, so I'm probably going to have to go with an Iwata Revolution CR unless you can give me a pressing reason not to? I've just bought a tank compressor with moisture trap etc that comes with 1x dual action siphon fed and 1x dual action side loading gravity feed chinese rip offs, which are probably going to be good for large coverage and not a huge amount else. If you could answer a couple of (admittedly simple) questions, I'd really appreciate it. :)

1. What kind of needle size produces what kind of result? Obviously it varies with distance from the model, but for working on X-Wing stuff, what size would you recommend?

2. If you're using a mask (and I will be), how essential is a booth for indoor work? Obviously you need something for catching paint overspray, but in terms of ventilation do you actually need an active fan system if you're in a large room with a window + door open plus a mask?

3. Provided you clean your brush after every use, whenever you change colours, or just every 5 minutes or so, how essential is the ultrasonic cleaner? I don't really want more clutter than absolutely necessary on my already overcrowded desk, and it seems like something that people use for "caked on" paint, which obviously shouldn't happen if you clean regularly to begin with.

Thanks for your time!

gathering information and will reply shortly. sorry for the delay

If the mask is filtering all the unwanted aerosol particles, you don't "need" ventilation really because they don't displace oxygen. Fumes will not be filtered without a proper activecarbon filter (not needed as long as you don't go overboard with your cleaning agents)

Great thread, really helpful. Only downside is that the Badger stuff is impossible to find easily in the UK, so I'm probably going to have to go with an Iwata Revolution CR unless you can give me a pressing reason not to? I've just bought a tank compressor with moisture trap etc that comes with 1x dual action siphon fed and 1x dual action side loading gravity feed chinese rip offs, which are probably going to be good for large coverage and not a huge amount else. If you could answer a couple of (admittedly simple) questions, I'd really appreciate it. :)

1. What kind of needle size produces what kind of result? Obviously it varies with distance from the model, but for working on X-Wing stuff, what size would you recommend?

2. If you're using a mask (and I will be), how essential is a booth for indoor work? Obviously you need something for catching paint overspray, but in terms of ventilation do you actually need an active fan system if you're in a large room with a window + door open plus a mask?

3. Provided you clean your brush after every use, whenever you change colours, or just every 5 minutes or so, how essential is the ultrasonic cleaner? I don't really want more clutter than absolutely necessary on my already overcrowded desk, and it seems like something that people use for "caked on" paint, which obviously shouldn't happen if you clean regularly to begin with.

Thanks for your time!

I'm going to make a confession here and say that i am a little weird when it comes to spray booths and caution. I will always stress caution before anything else, and as a result, my answer will always be a "yes", but how you get to that is up to you and here is my point.

So, the spray booth, i have a few points to make on that one:

1. you should always have some kind of active exhaust system when airbrushing. It know it doesn't seem like a lot of exhaust, but believe me, it doesn't take much to cloud up a room, especially in the interior of the home, even in a bigger room and having a window open often times just isn't enough. I don't think that airbrushing one model, with very little work is a big deal, and probably doesn't matter much, but if you get into a serious session, like repainting a few ships at one time or an epic ship, you can find yourself in a cloudy room before you know it.

2. Your right, wearing a respirator will protect you, even if you don't have a spray booth, but without some kind of active ventilation, all that stuff you're spraying into the air has to fall somewhere, and if its just you in the home, its probably not that big of a deal, but if you have pets, children or a spouse/roommate/significant other in the home, they will appreciate the spray booth as much if not more than you do.

3. It wouldn't be the first time a new air-brusher has spent one or two nights in the dog house because they decided to make the wall behind their spray area a different color on accident. Spray booths are designed not only to catch fumes, but also prevent you from turning your wife's walls into a decidedly decorative alternate color. Fact of the matter is, you are going to make mistakes, and it will happen. also, you are going to do things like tip the brush too far to one side, and spill paint out, or you are going to splatter paint, drop the airbrush, or a host of other things that if you are using a spray booth you will prevent.

4. While it may not seem like a big deal, atomized cleaning agents are irritants. For this reason alone, I strongly recommend a spray booth. Cleaning agents, especially if you breathe them in, can be very hazardous, and not just to you.

5. Spray Booths are easy. You can buy one, sure, and thats the route i took. I have two of them, one huge one in my garage i used for cera-coating, stripping, and re-touching firearms as well as large projects, and a smaller one inside my home with a fan and vent kit connected to a window for exhaust. But you don't have to have that expense. You can just have a moderate sized box, or a cabinet (like the above user posted) with a home hepa certified filter in it with a fan connected to a dryer-vent kit. those work great too.

As far as the airbrush, I am personally not a huge fan of Iwata, namely because of the cost of replacement parts, but that is here in the US, and realistically, probably isn't as much of a draw back as i probably make it sound. The reality is that as long as Iwata is available in your area, and it isn't super expensive, I say go for it. Iwata make wonderful airbrushes, and you will grow into the airbrush as you mature with the hobby. Iwata air brushes are engineered extremely well, and while some of their older designs still used rubber seals to hold the paint and keep the air pressure steady, their newer models, like the Revolution CR are all machined to tolerance, like a Badger, and you wont experience problems like i did with my Eclipse (my Eclipse is a 1st generation eclipse, and used rubber gaskets, which would wear out under pressure and time and crack, creating leaks in air pressure and paint flow. not a big deal, i just learned to have a few extra "O" rings lying around.

and on to the other two questions: sorry this is taking forever.

In terms of needle size, there are all kinds of different sizes that are given. everything from .13mm to .75mm, and that needle size is a little misleading so lets discuss it.

The needle size, much like the spray regulator size does help determine spray pattern and the width of the line, and while most companies will tell you they have the smallest needle on the market, it's really kind of misleading, because needle size isn't the end all be all of how fine of a line you can produce. In short: size does matter, but not as much as you think ;)

Super fine needles, like the .13mm on a Harder and Steenbeck Infinity, or in the Paasche Talon G3 can produce pencil thin lines, but there is a drawback: those needles were never meant to work with acrylic paint. Mainly designed for illustration, they are more designed to work with Inks and other liquid pigments, and require extremely low air pressure to operate effectively, making them a real pain to work with acrylic paints. Normally, in my SOTAR or my G3, I have to thin down even already thinned airbrush paints to get them to shoot consistently and well, that can become a problem when working with a lot of different colors one right after another, because it adds a step to troubleshoot when working. (instead of clean, fill, shoot repeat, its now clean, dilute, fill, test, shoot repeat).

Its because of that, i like to keep my needle sizes in the .21-.50mm ranges. The .21-.33 ranges are more than fine enough for detail on X-wing models, and anything that requires more detail than that you will probably need to go to a traditional brush for control for anyway. The .4-.50mm heads to me are best all around use and produce some of the most extremely consistent sprays for acrylic paints. The needle, and likewise the nozzle is a little heavier, and bigger, allowing the larger pigment used with acrylic paints to shoot through it freely, helping to reduce tip-dry and keeping the paint moving. This allows me a needle and head/regulator (I use those terms interchangeably. To be technical, the metal piece that the needle rests in at the tip of the airbrush is called a spray regulator, and commonly called a "head" or "nozzle". It's the small, often cylindrical tiny metal piece that the needle rests in before you put the outer housing on the airbrush.) For fine detail, and one for medium sized details and coating larger models at one time with one color.

In terms of spray size, i tend not to think in terms of actual size of the needle or head, but think in more generic terms like, ultra-fine, fine, medium, and large. The reason i do this is because if you went and bought a value-pack of Gel ink pens, and wrote solid lines, that is approximately the smallest line you can produce with the corresponding head on an airbrush. An ultrafine Harder and Steenbeck Infinity can produce an ultra-fine line (it even comes with an adapter that you place on the paper so you use a ruler with it and write with it. Its pretty neat), and a fine will produce about what a heavy fine line will out of a gel pen and so on. This isn't an exact gauge, but it is a pretty decent guide, and it takes a lot of the guess work so many people go through when purchasing an airbrush or deciding on what needle size to use. I say keep your needles relegated to the fine and medium size brackets, and you'll be just fine, regardless of what brand you are using and their actual "dimensions".

Lastly, the Ultrasonic cleaner: I recommend having one. You will find that even with a strict cleaning regimen, your airbrush will "acquire" deposits of paint and other stuff (varnishes are really bad here. They dry really fast and form a coating on the model, making them a pain to clean up completely out of an airbrush unless you are really experienced or really over cautions) and won't often come out with traditional "shoot and clean" application. To make cleaning your airbrush more frustrating, you should NEVER use any kind of cleaning brushes on your airbrushes. Ken Schoefiled talks about this at great length, and you can easily do a you tube search for him talking about intro to airbrushing. Using brushes creates abrasions on the inside of he airbrush, and can actually damage heads, nozzles, and the interior and anterior chambers of the airbrush, creating micro-leaks that can affect performance, so for me, the only real way i can get an airbrush really clean is to use an untrasonic cleaner on it.

That isn't to say they don't have their uses. Ultrasonic cleaners with some simple green will strip a model very quickly, and they are and can be used for a ton of household uses, like cleaning jewelry, electronic contacts, removing rust or corrosion, cleaning airbrushes, and so on and so forth. They are handy devices to own, and my wife routinely empties my cleaner so she can clean her wedding ring and earrings. Hell, I even loaded one up with de-greaser, de-bonder, and general purpose cleaner and "saved" a Glock-17 pistol from the scrap heap and returned it to use by getting debris that was trapped in the action of the firearm clean and clear after disassembly. I cant count how many AR-15 Bolts i have disassembled and dumped in a cleaning solution to begin getting the carbon out of the bolt carrier group because patrol offices cant be bothered to maintenance their firearms correctly. if it can be used for all of these purposes, I'm sure it will find a use in your home too.

If you can't tell, i am a big fan of the ultrasonic cleaner, and for 30.00 or so bucks (some cheaper, some more, i sprung for an a more expensive version to get a little more work out of it) they are great for a variety of uses and you probably could benefit by having one, so i heartily recommend yes.

Edited by sc077y

That's amazingly helpful! Thank you very much for the time and effort you obviously put in, both for the original post and your answer above. I (and anyone else reading) really appreciate it. I'll be taking everything you've written here under advisement when getting started with my new kit and deciding what to include in my airbrush workstation!

What do you use for clear coating ?...Do you layer your paint , coat and paint over it ?

Fantastic topic, thank you! I'm seriously looking at trying to airbrush some minis, and this will definitely help me on that.

What do you use for clear coating ?...Do you layer your paint , coat and paint over it ?

Paint and Finishing additives....there are a lot of options on the market, thats for sure, i'll run down a few that i use:

8D3FEDE1-65CC-4E8E-A36D-6D5DA2925C85_zps

For most of my friends, this is one of the most confusing pieces of airbrushing that they have to deal with, is what paint additives to use, and what paint sealants to use, so ill walk through a few different types of additives and a few different sealants and what their benefits/uses are that i have found. Please bear in mind that again, this is only one persons opinion, and when making decisions, ALL opinions and professional reviews should be taken into consideration.

so, here we go!

Brands:

Liquitex, Vallejo, Tamiya, Badger, Golden ect - all of these brands are great and will do the job wonderfully. There are many more brands, some more expensive, some less, and as a general rule, i say purchase and use what you can re-stock, because each brand will have their own unique charectoristics. Liquitex tends to be a little more "dull" when compared to Badger in terms of their finishing products, like Matte, Satin and Gloss overcoats. Golden is thicker, for sure, and is almost gel like, even with their thinnest products, Tamiya is very good, but sometimes feels like it dries almost to a brittle surface, and if a model breaks, i have seen/had Tamiya finishing products "crack" far beyond the point where the model broke.

As a general rule, i recommend Liquitex. In my experience, it has been the most consistent in quality, and if there is a hobby store fairly close to you, its readily available. Their almost FULL product line can be purchased at Hobby Lobby, Michaels, Franklin, or any other major crafts retailer out there. Hell, even some Wal-Mart stores with an expanded hobby and art section even carry Liquitex brand products.

In terms of finishing products, they typically come in three variants: a gloss finish, a matte finish, and a satin finish.

Gloss finishes are just that: glossy. They will make the colors more vibrant and provide a very color-intense finish to the model. The downside to glossy finish are that you sometimes don't get what you want: while they will intensify the color range on the model, sometimes they can make moderate tones appear dark, or bright colors can become over the top bright and become a distraction. Additionally, light will bounce right off of that finish, and glare becomes a problem, so if you're doing the finish with the intent to put the model in a show case, and take pictures, you might not want a Glossy coat. Conversely, if your doing something or working on a project that you want to make the colors maintain the highest level of contrast, and deepen all the colors, a gloss finish will work wonders for you. You can even tell, in the picture above, that my game board is coated in a Gloss finish, because you can see, under normal light, the reflection of the bottles on the board!

Matte Finish is the exact polar opposite of a gloss coat. It will dull down and reduce the contrast between colors, and can even make some details drown out if they aren't painted very brightly. Additionally, matte coats don't have the reflective quality that gloss coats have, so the colors don't appear as vibrant when coated. The plus side to a matte coat is that they often dont change the color range of the model much, and don't reflect and glare too much light, making the matte coat a common choice among gamers to finish their game pieces in. in the below pic, i have a few models matte finished, and one gloss finished. I think you will be surprised at the difference. The gloss coated model was done for a painting competition, the other two models were done as play models. I hate to keep using privateer press models for examples, but its what i have painted, and give me a few months and ill get some more FFG X-Wing models out there...(its also important to note that i am not a professional painter, and someone with more talent than myself would have better examples to show off)

8260A909-DA04-4B0B-A1AF-549EFDFB842B_zps

The smaller models to the left and right were both coated in matte finish. You can see in the example that the colors are more "muted" than the Warjack in the middle (despite the bad lighting for the picture) and on the Warjack, you can even see where the overhead lights in my game area are reflecting off of the gloss coating. You can also see where the work has been done to shade the blues on the Warjack, and the blues, and their lighter and darker shades are far more vibrant than the differential on the shades of the on the other two models (however, under better light, there are different shades on all three models).

The last main coating is a mix between the two. Satin coats are designed to give the color vibrance of a gloss finish, without the glossy, hyper-contrasting finishing that gloss coats give. Satin finishes are very useful when you have models with really small but high contrast details you want to pull out, without dulling down their impact, or toning the flat colors down at all with a gloss coat (or if you just don't want the "glossy" look). The only problem i have with Satin coats is that often times, they just end up looking like a weaker or lighter gloss coat, and that relegates them to very specific purposes or specific jobs, because most of the time i either want the model to not reflect light and be glossy, for playing a game with (like with a matte coat) or i want them to be as vibrant and crisp as i can get them (like to show off in a display case or at a painting competition).

On to additives. I know this wasn't asked for earlier, but they kind of go hand in hand in my book, so figured i would give everyone my run down on additives, and you all can take or leave what you like :)

There are a tonne of paint thinners, additives, flow improvers and everything else on the market designed to be added to your paint to give it different qualities. I'll talk about a few of the most common additives and what they do for the paint.

First to mind is the drying retarder. It is extremely useful for a multitude of reasons. Drying retarders keep and slow the paint drying process. For an airbrush, this is extremely important in delaying paint from building up on the tip of the needle (tip dry) and keeping you shooting for longer periods of time. Outside of an airbrush, drying retarder keeps your paint from drying, allowing you to blend paint colors and layer more effectively.

Next up is the flow aide. The flow aide is designed to make the paint flow easier and more smoothly by breaking down the surface tension in acrylic paints. Flow aid in an airbrush also helps the paint move smoothly, and also helps to prevent tip dry, as well as making the airbrush easier to clean up after the fact. On the standard brush, flow aid will allow paint to smoothly glide off of the paint brush, and thin the paint. This technique is really handy when you need to produce really thin bold lines, as the drying retarder plus thin paint will turn our paint brush into a pen under the right circumstances, and under the right brush.

Thinning medium, not to be confused with airbrush medium is designed to reduce and thin paints. It's interesting, because while some paints thin very well, like P3 and Vallejo, other paints don't thin as well, and if you have ever thinned a paint with just water, you will notice that at some point, the paint will break down in water, but with a thinning medium, it is actually the acrylic medium solution that the pigment is suspended in, meaning that you can super thing your paints without worrying about pigment separation. It's a nifty little advantage that will allow you to wet blend and layer colors more effectively, and putting it together with some retarder to keep the paint wet, and some flow aid to keep the paint moving, and you can create paints designed to go on in translucent layers, or to capture the smallest of details.

So there you go, while this wont cover every type of paint finish, or every type of additive, there are several that are great and provide a multitude of uses.

Love the thread and I just want to add that an Airbrush is great for making long jobs right quick.

20 minutes of airbrushing and I was done with all my Space flight stands.

675357_sm-.jpg

Listen to sco77y, he knows his stuff. I was a trial by error guy, wish this was around before I started using my Airbrush ^_^

Hey vent, im probably going to steal your base idea from you BTW. I LOVE them, they look great!

My 2 cents on airbrushing :

1) Start with a good airbrush.

By this I mean a good quality airbrush, you don't have to spend hundreds of dollars, but something from a good brand around 80-120$. I started with a cheap chinese 20$ double action airbrush and I suffered greatly from the unnecessary steep learning curve.

I then bought a Haarder & Steinbeck Evolution classic in 2008 : http://www.harder-airbrush.eu/evolution/

Haven't changed since. It's an all metal design, with solvent resistant PTFE seals that will last you a lifetime.

I did change the needle after an infortunate bending accident while cleaning and bought a bag of seals just in case, but haven't used them yet.

I use exclusively the 0.2mm noozle for all my projects, changing the cup for larger size projects like terrain but I can see that a larger noozle in the 0.4-0.6mm range could be useful.

xwing-repaint-lambda-imperial-shuttle-st

2)Use a compressor with a tank

The tank will improve airflow and pressure stability plus reduce the time the compressor engine is used, improving the lifetime.

After that it really depends on where and how you use it, you need to check : pressure, airflow, and noise.

3) Paints and thinners

I have 2 main sources for paints.

a)Airbrush paints (I thin these with a 50/50 mix of windex and demineralized water):

Hansa Pro-Color range is awesome :http://www.harder-airbrush.eu/procolor/ , the white especially has exceptionnal coverage and I use it on all my models for pre-shading after a black undercoat.

Vallejo/Prince August Air : another great range that I often use. The varnishes (mat/satin/gloss) are especially good (I use them either with the airbrush (prefered option) or with a regular brush.

b)Regular acrylic paints (I thin these with Tamiya X-20A thinner):

Any good range of paint will do : Games-Workshop, Vallejo, P3... as long as you thin them enough. I used to clog my airbrush regularly using those paints even well thinned, but that stopped when I switched to the X-20A thinner.

xwing-millenium-falcon-repaint-weatherin

4) Cleaning

Always clean your airbrush after use! You can get great tutorials on this on the web so I won't go in length here but remember that fresh paint is always easier to clean than old dry paint.

5) Have fun!

xwing-decimator-repaint-starboard.jpg