Hothie's CR90 Run-with Pics and Analysis

By hothie, in X-Wing Battle Reports

Third round:

Bandit did a 1 bank, which collided with Jendon. One Black did a 5 forward with barrel roll, the other 2 Blacks did 2 forward with barrel rolls out of the way of the CR90. Roark did a 2 right turn, hoping to block (ioned) Vessery from barrel rolling out of the way of the CR90. Etahn did a 1 right bank with focus. Jonus did a 5K, which collided with one of the Blacks, he rolled a hit from his Minor Hull Breach, Vessery did a 1 forward due to ion and focused, Jendon did an Advanced TL on Etahn and Dutch, then stopped. Dutch did a 1 right bank, which collided, Wes did a 2 left turn, keeping his stress but getting a shot, Airen did a 3 right bank, which collided. He didn't take a hit from overlapping the rock.

CR90 did a 1 left bank, running over Vessery, taking no damage. Fore action was TL Blacks, and aft action was Toryn Farr, pulling both TL's off of Jendon.
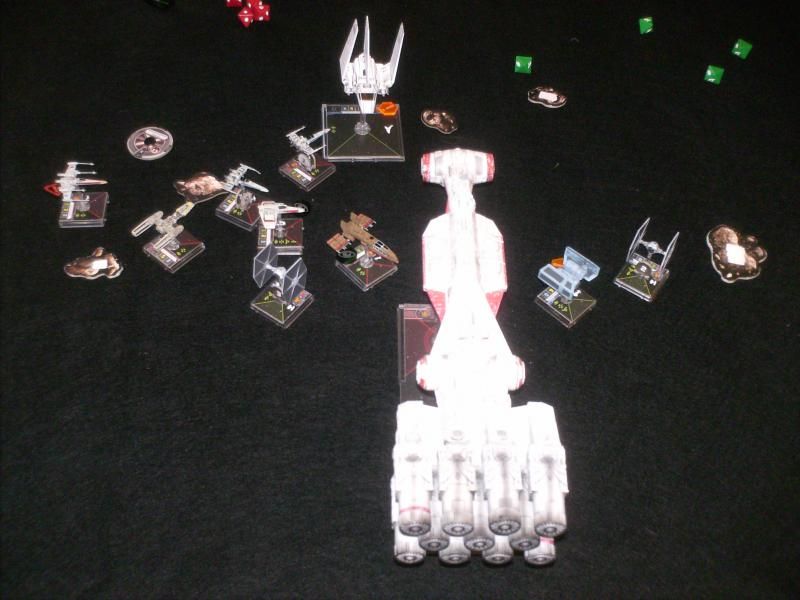
2014-09-14094631_zpscea1d656.jpg

Combat:

Roark made the CR90 a 12. CR90 only had 1 shot, but made it count. Fore QLC spent TL for 2 crits and 1 hit on Black with 1 evade. Crits were Direct Hit and something else, so Black that Jonus collided into was out. Airen rolled 2 hits with 1 evade on the closest Black. Dutch then grabbed a free TL on the Black, and let Roark do the same. Wes's shot on the same black was evaded. Jendon put 1 crit and 1 hit on Etahn (sensor jammer turned a second hit to focus), who spent focus for 2 evades. Dutch ioned the Black, Etahn's shot was evaded. Only Black with a shot took the last shield off of the CR90's fore section. Roark ioned the closest Black, putting the third hit on him, killing him. Bandit didn't have a shot.

Third round casualties were Vessery and 2 Blacks, and with 3 Imperial ships left on the board, we called it.

Edited by hothie

God that sounds like a rough game for the imperials. Shows what happens when you don't take precautions against getting rammed. I think that he flew vader close to the corvette expecting you to set up for a broadside. Nice job on that one, and thanks for another great CR90 batrep! Very well flown and written up, as usual.

maybe I missed it somewhere, but aren't collisions with Huge Ships supposed to destroy small and Large Ships?

maybe I missed it somewhere, but aren't collisions with Huge Ships supposed to destroy small and Large Ships?

Yes, they do. But the huge ship has to roll for damage as well. I have been lucky to not take much damage in my 4 games of TIE Bowling. :)

Not that I think the Rebels are overpowered with the huge ships (which apparently they're not, which is why this thread was triggered and hothie has done such a good job proving that Rebels can win with the huge ship :P ), but I can't wait till a huge Imperial ship shows up, because the ramming aspect of huge ships is actually quite impactful when playing against them. It affects how you deploy, which angle you come in from, and with great placement of the rebel ships and asteroids (like hothie has shown in his pictures), it really limits the imperial team's ability to attack the huge ships without a turn of "panicked scrambling" to get out of the way of the ships during Turn 3 or 4.

The last Epic game I played, pretty much all the ships destroyed by the Rebels were done by huge ships ramming. MOST impressive I must say. ;-)

Great write ups and commentary from the two of you. Thanks for that. And the pictures were very nice.

I've played 3 games with my CR90, winning quite handily all three times First game, I got a good crash course on energy managment. I over packed the big ship with upgrades I never used and found myself hurting for E. My escort was not as impressive either... I tooK a Y-Wing, a Z95 and three X's which did pretty well despite their low numbers. In the end, it was the CR90's ability to soak damage and pick things off at range and "TIE bowling" ability if they stay too close that really does make it imposible to ignore the Corvette. With a reasonably well used escort, the opponent can't ignore either element and ends up getting divided and conquered.

One game I played against my son was the closest I came to really getting beat up. While I was focusing on the furball, he had a Squint and Eyeball exit the scrum ending up at range 1 right behind the CR90. I had burned my action restoring shields so hadn't reinforced. Between the two fighters, The Squint stripped the shields and the eyeball inflicted a couple crits. If he had been able to put another ship or two into the attack, he would easily have crippled me due to some previous damage. As it played out, he wasn't able to follow up the next turn and the shields went back up.

You've really got to be able to focus a lot of fire on one section of that ship to take it down. Both of my opponents found it very frustrating to knock down the shields and inflict a point or two only to have to start over with the shields the next turn. From my side it was frustrating trying to keep the shields up and powering all those gun upgrades. The first couple turns, the guns got a lot of use. But the last couple turns were all about pouring all my energy into the shields to stay intact leaving the guns silent. I also got a lot more use out of the Quads than the Turbo Lasers. The turbos are best used against low agility Large ships which none of my opponents used. Swatting TIEs with a turbo laser is highly ineffective (effective AG of 6).

I also have the Reb Transport and had the most success using it as a battering ram and a much better location for Toryn as there's much less competition for that energy. I don't see ever using them in the same list unless it's a 4+ player game and someone else can provide the fighter cover.

-DavicusPrime