Hothie's CR90 Run-with Pics and Analysis

By hothie, in X-Wing Battle Reports

WARNING: this is going to be long and with lots of pics.

I posted many thoughts and things that I have found while playing Epic games here:

http://community.fantasyflightgames.com/index.php?/topic/120981-my-epic-findings/

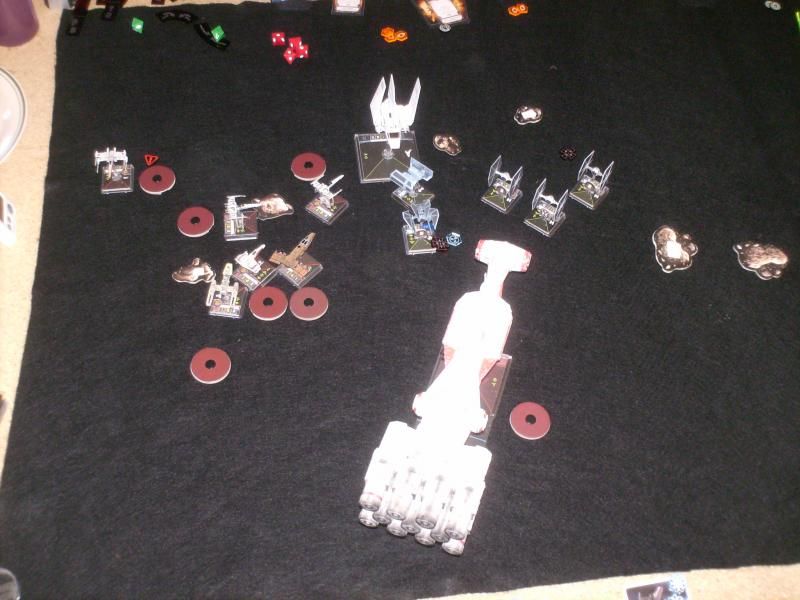
I have always played Imperials, so I decided to make up a Rebel CR90 squad, so that I could answer some of the criticisms posed to me by the community. SimonSays3 came over, and he and I played a game with 2 squads that I had made up.
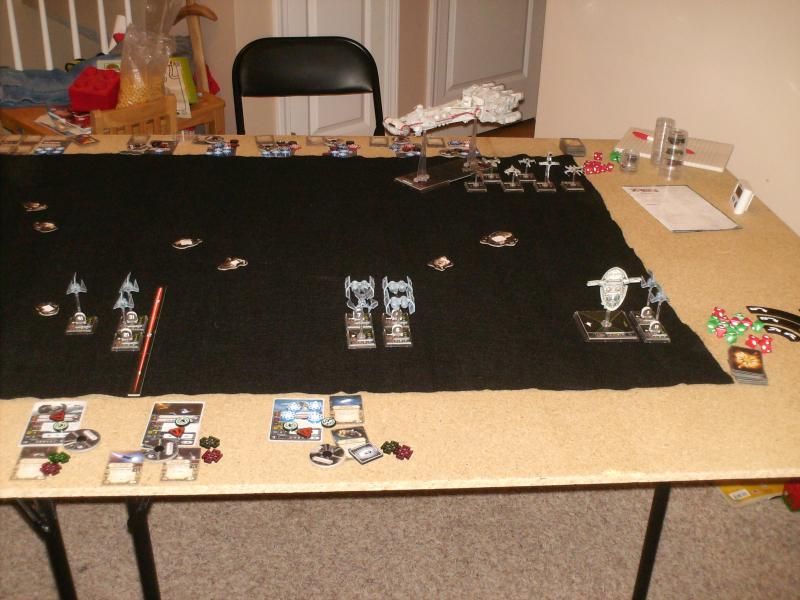
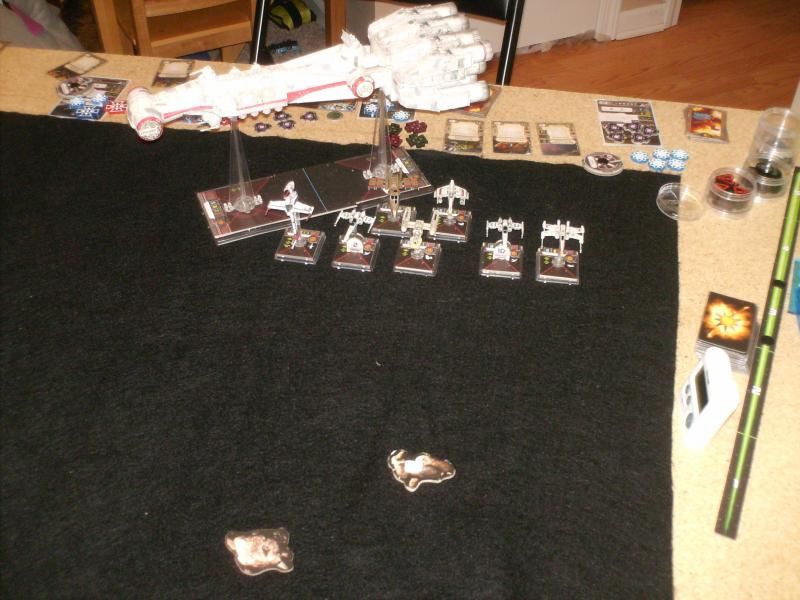
Rebel Squad: (me)

CR90-Fore (75)

Single Turbolasers
Quad Laser Cannons
Gunnery Team

Sensor Team

Weapons Engineer

CR90-Aft (56)

Quad laser Cannons

Toryn Farr

Tibanna gas Supplies

Wes Janson with Veteran instincts (30)
Airen Cracken with Veteran Instincts (20)

Dutch Vander with Ion Cannon Turret (28)

Etahn Abaht with Sensor Jammer (36)
Roark garnet with Ion Cannon Turret (24)
Dagger with HLC (31)

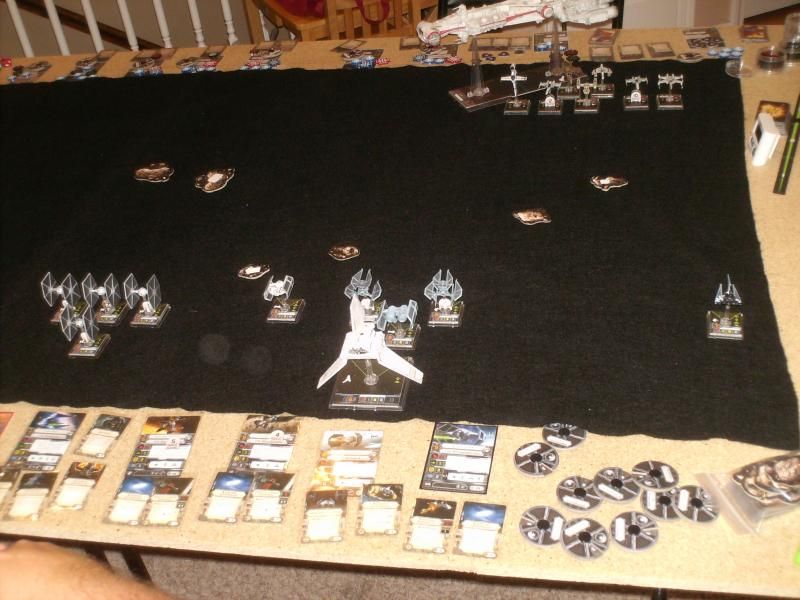
Imperial Squad: (SimonSays3)
5X Shadow Squadron Pilots (135)

Rexler Brath with HLC (44)
Major Rhymer with Cluster Missiles and Ion Pulse Missiles (33)
Captain Jonus with Squad Leader (24)
Gamma with Cluster Missiles and Ion Pulse Missiles (25)
Bounty Hunter with Engine Upgrade and Seismic Charges (39)

The Rebel Squad has lots of synergies, the CR90 isn't loaded to the gills, and the loss of a few escort ships still leaves a good squad with synergy. The Imperial squad is a good mixture of Primary and Secondary attacks, with lots of HP, which is the way I like to build Imperials for Epic.
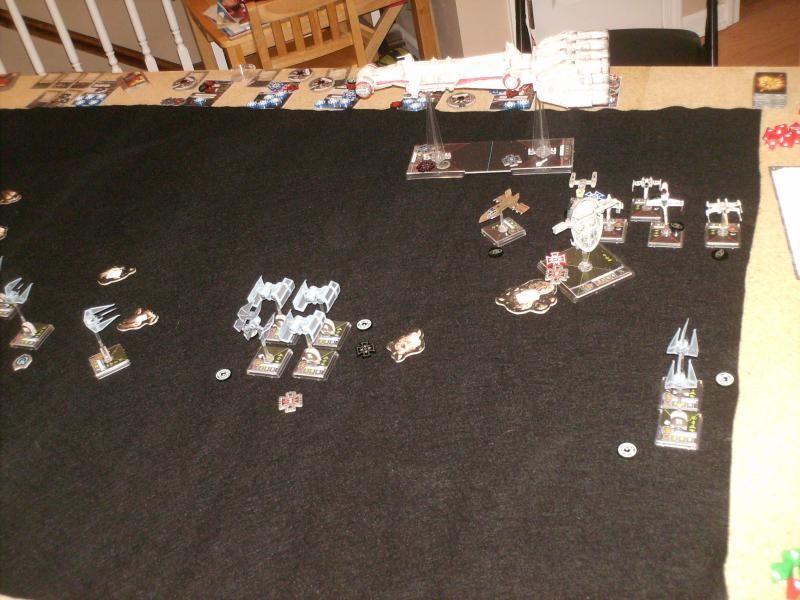
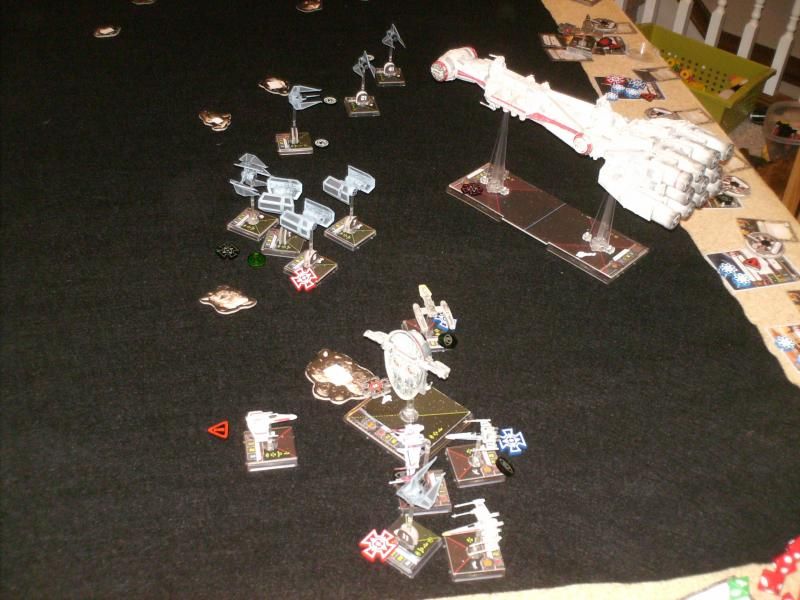
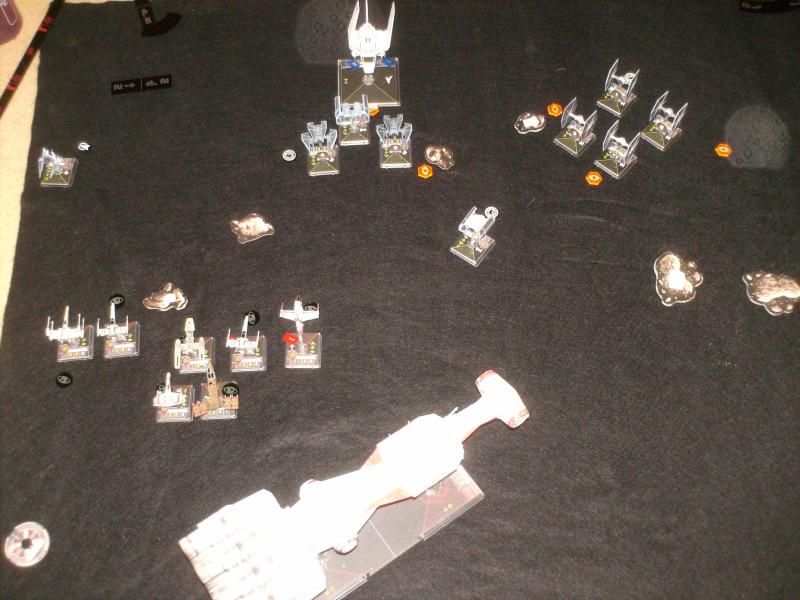
The game:

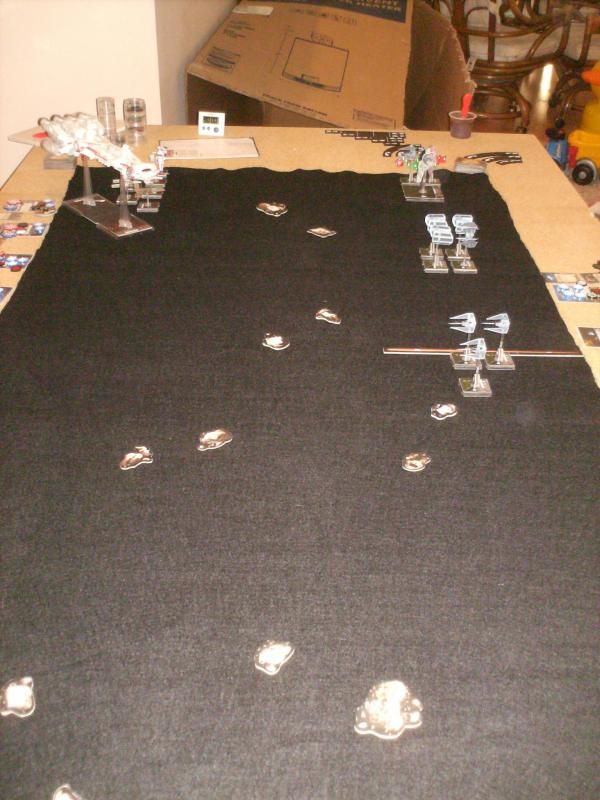
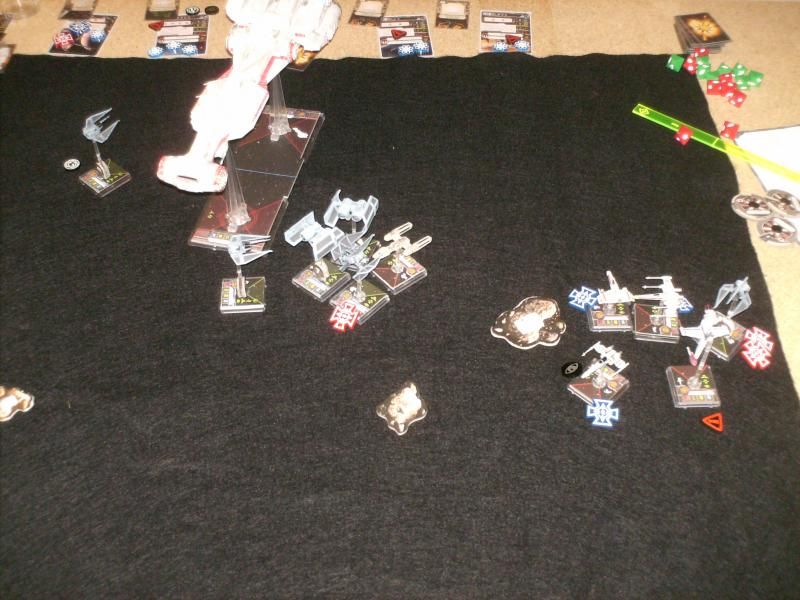
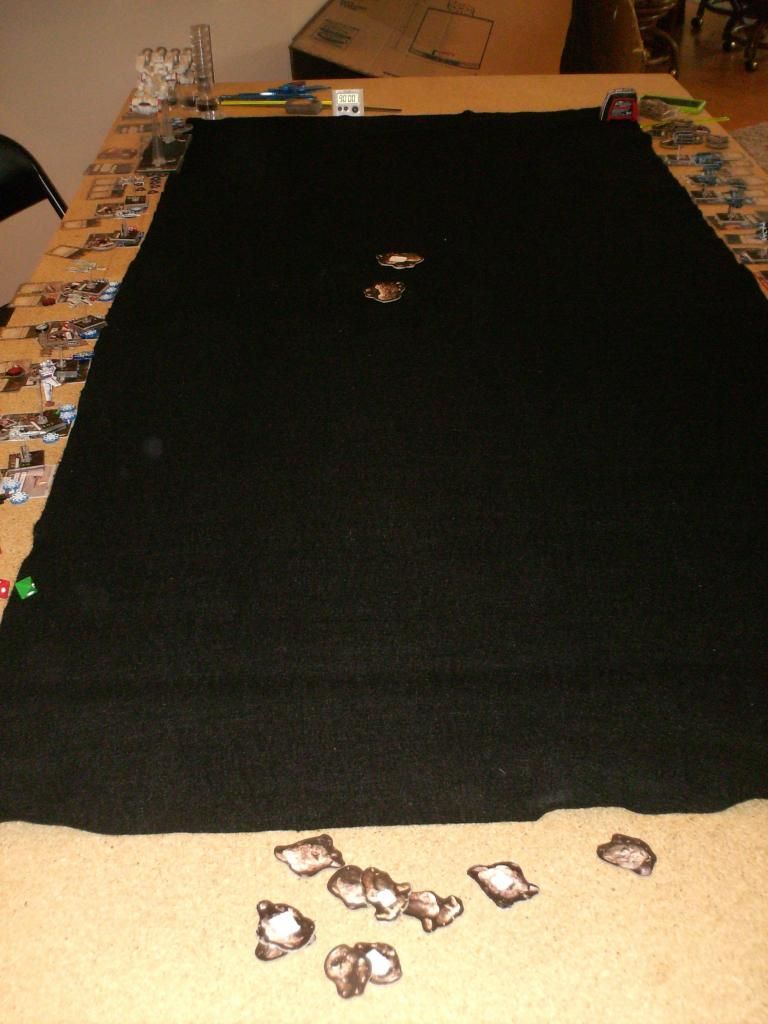
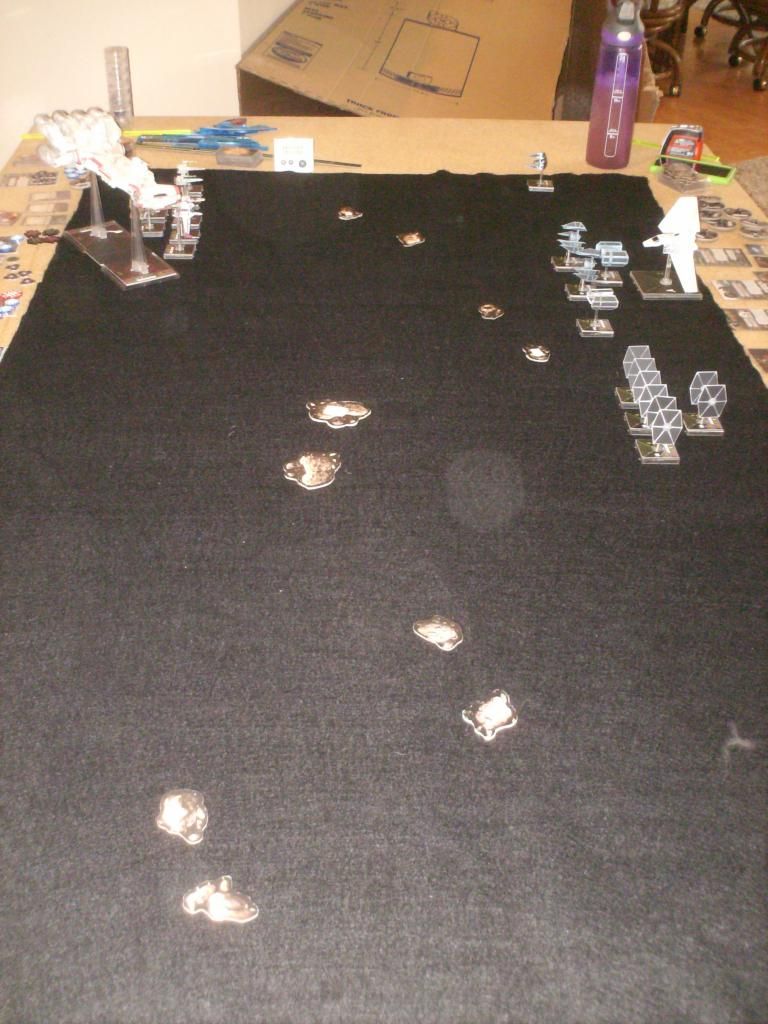
Since we were both at 300, I rolled a die, and he called it correctly. He decided to take the initiative. He decided to place the first rocks. I had planned on setting up on my right side, but since he put those here, it sort of foiled my plan, so I had to be flexible and go from my left side.

HPIM1242_zpsb6ca40bf.jpg

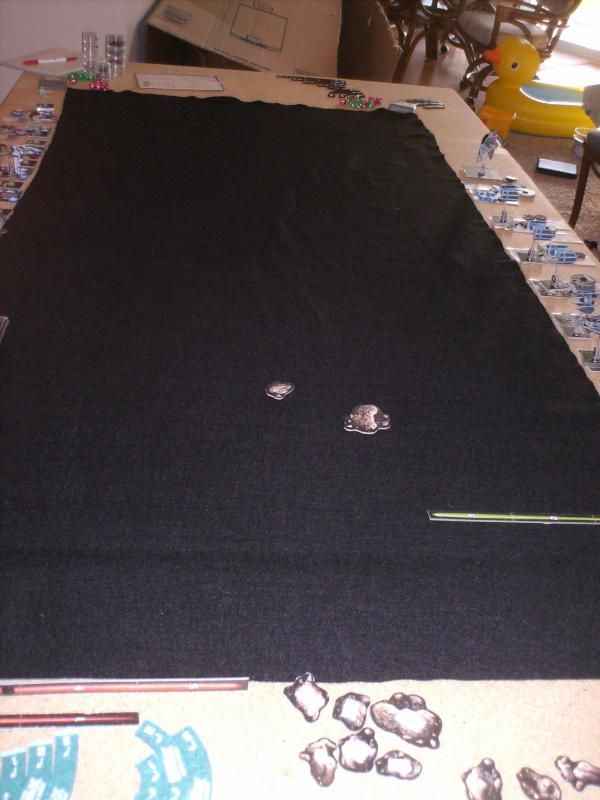
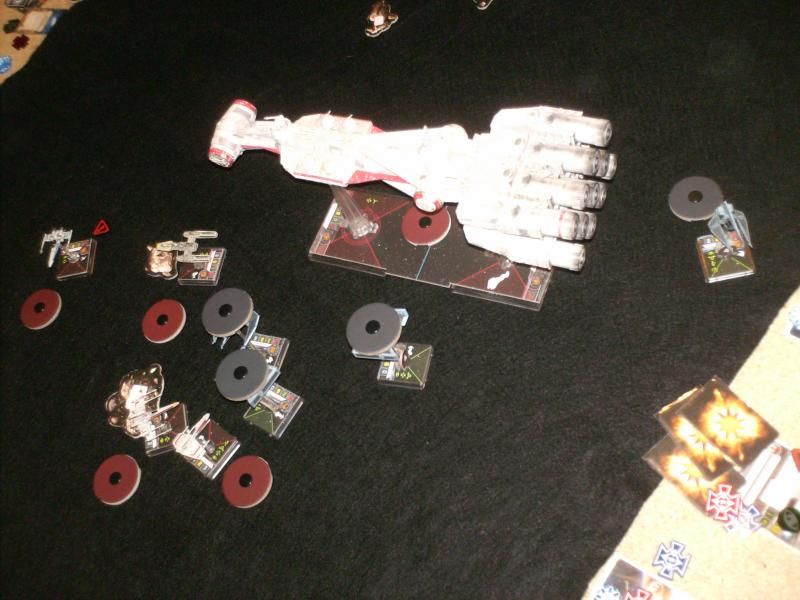
I knew I wanted to set up with my CR90 mostly horizontal, with my escorts protecting its aft section. So My 2 asteroids tried to block his way in to my CR90's aft section.

HPIM1243_zps4e52228c.jpg

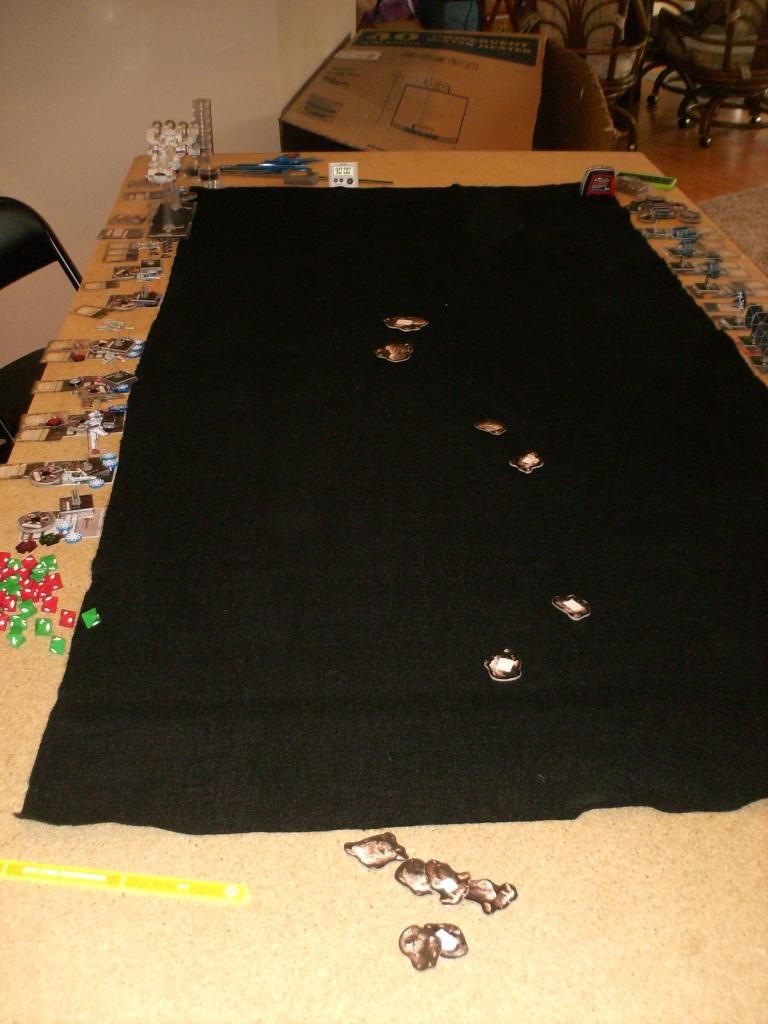
I knew I was setting up left side, so I didn't care about these asteroids.

HPIM1244_zps10513cfd.jpg

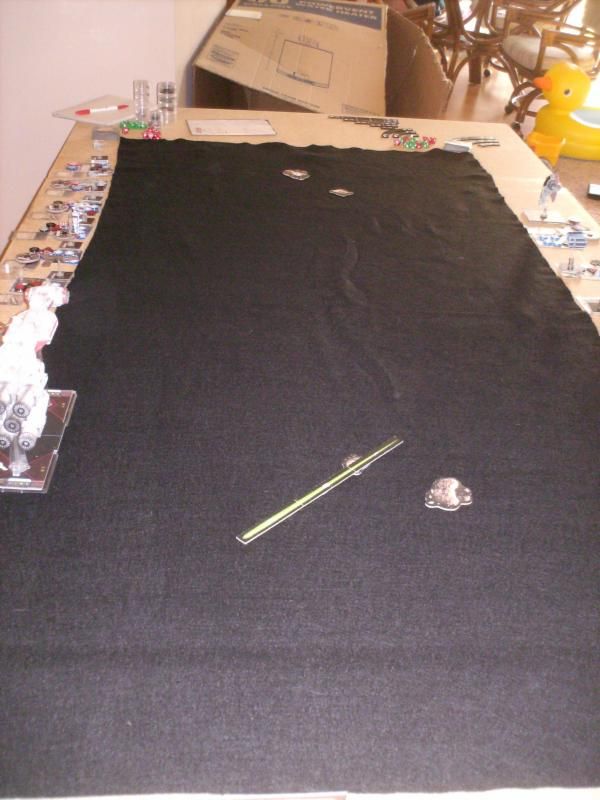
I wanted to create openings to funnel him into my secondary weapons, which is why I set these asteroids up like this. It also left me some room to maneuver my ships.

HPIM1245_zpsd18500a3.jpg

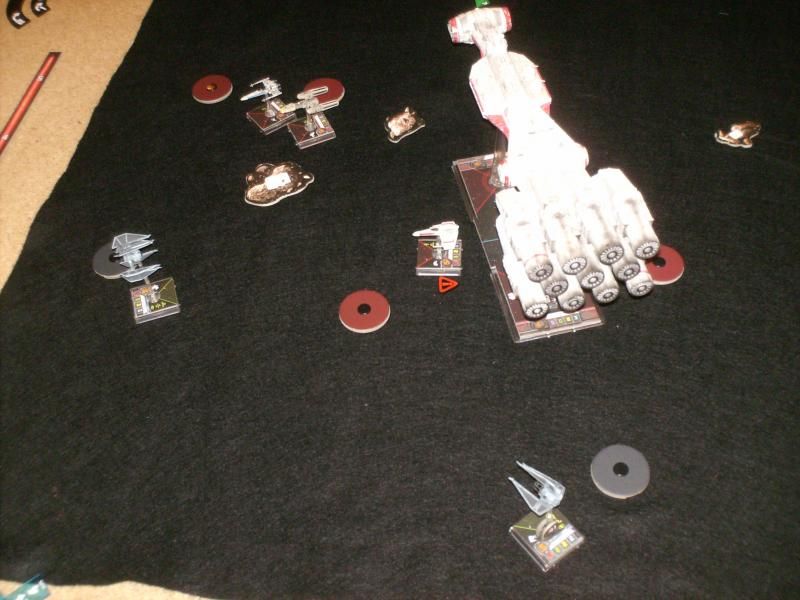
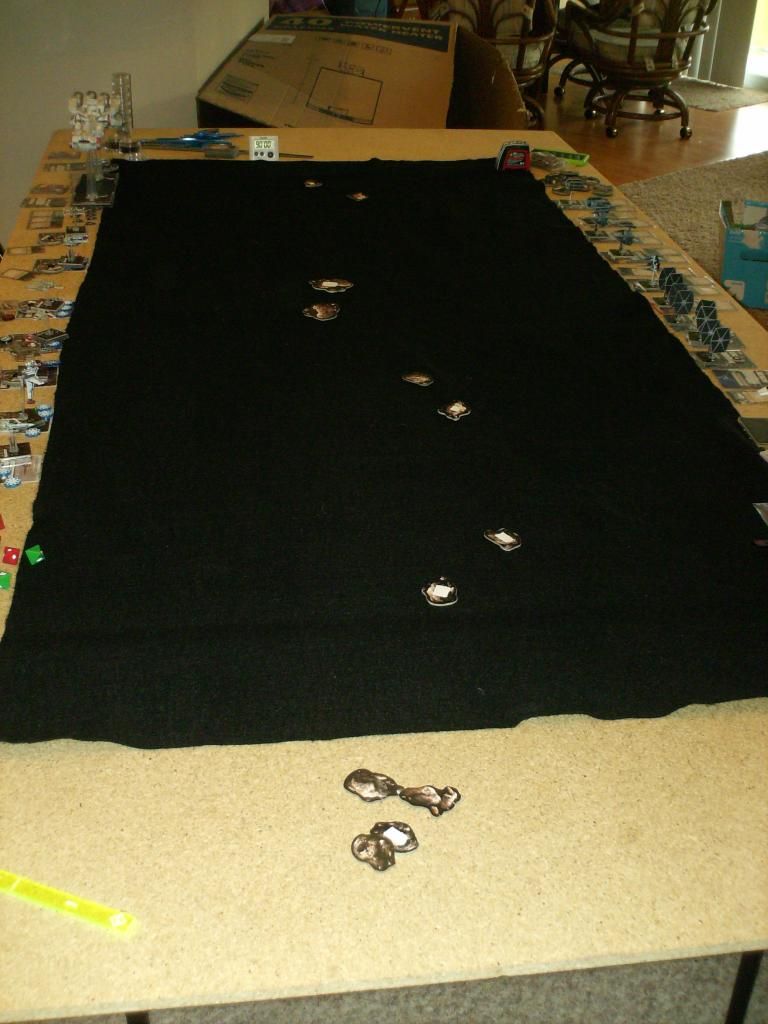
Again, I didn't care about these asteroids, as I was going to be on the left side anyway. These ones mainly just closed off the open area in the middle, further limiting how he could get to me.

HPIM1246_zpsff0f8d01.jpg

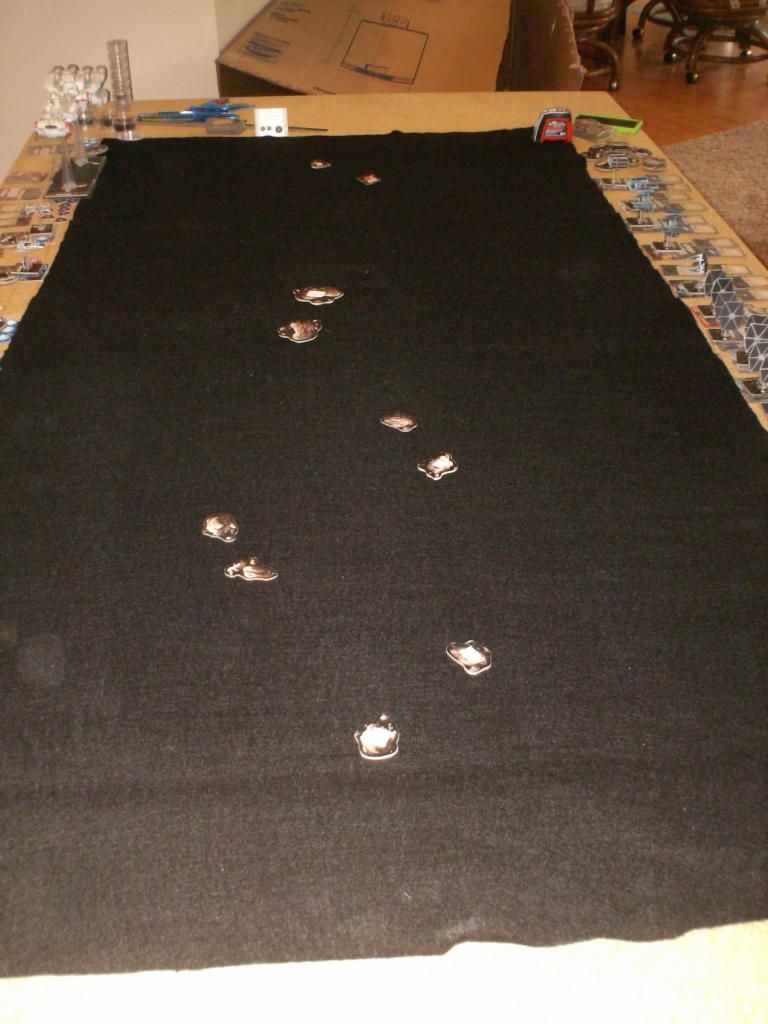
Last 2 I placed to further limit his opening move and set up options. As you can see, I have a big area to move my CR90 around in on my left side, which is nice. These rocks also are out of my way, so I wouldn't have to worry about them once the fighting starts.

HPIM1247_zpsa7e74b5f.jpg

Edited by hothie

Set up:

With the asteroids down, and a big open space to my left, I set my CR90 up there. I wanted to give myself room to bank first turn. I did make a mistake with the angle, though, because his Gamma was able to go 4 fwd and TL first round, just barely. So in the future I need to set up just a little more horizontal with my edge of the map.

HPIM1248_zps8481794f.jpg

His set up was partially due to my asteroid placement. My CR90 set up first, so he placed his BH to where it was going to be getting good aft section shots, all the while staying out of danger of getting run over. Then he placed his bomber in a good spot for the Secondary Weapon ships to converge on the CR90. After I placed Roark and my Dagger, he didn't have a good spot for the Shadows, so he split them up. Later we talked about it, and he should have kept them all together on the left side, and just swooped in with a wall of 20 dice at the CR90. But he split them up, 2 by the BH and 3 by themselves. And notice also where I placed my second set of asteroids, and how that affected his Shadows, pushing them out farther, leaving me at least 1 round of not getting attacked by them, which is always big.

HPIM1249_zpse8e57e0e.jpg

I wanted to set up such that my squad was protecting my aft section, because that is generally the prime target. This set up also put my fighters' bonuses to the best use. I also wanted to set up so that I wouldn't have to worry about my CR90 running over any of my ships. This set up all of my ships are on one side of the CR90. I have played against a split set up, and It was easier to take apart with only half of his fleet engaged in battle at a time, while the other half had to wait to get around the CR90. So I wanted to make sure that my escorts were all fighting together, getting the bonuses that I built the squad for.

HPIM1250_zps30a20a45.jpg

Round 1:

His BH did a 4 fwd and boost, which was a fantastic maneuver. It got right in my squad's way.
Then his Gamma did a 4 fwd and just had the tip of the CR90 for a TL, which was my set up mistake.

Roark did a 2 bank and focus.
Dagger did a 2 fwd and focus.
Then his Shadows moved. The ones on the far left did 4 fwd and cloak, while #31 did a 3 bank and Barrel Roll. #1 and #11 by the BH both did 3 fwd and focus.
Etahn did a 2 fwd, which collided with the BH.
Jonus then did a 4 fwd and used Squad Leader to give focus to the Gamma.
Dutch did a 2 fwd, which missed the BH and Etahn, so he TL's the BH, and since the CR90 hadn't moved yet, the CR90 grabbed TL's on Jonus and the BH with Weapons Engineer.
Rhymer and Brath did 4 fwds with focus.

Wes and Airen both did 2 fwd, neither of which collided. Both focused.
Then the CR90 did a 1 bank. This actually spun the CR90 enough that the gamma was now out of range 3, which was fortunate.
I started with 5 energy, so I didn't get to use the 3 that I gained from moving. I allocated 2 to the Single Turbolasers and 2 to the Aft Quad Laser Cannons. That left one on the CR90, which I kept. I then reinforced the front section with my Aft action and coordinated with my front action. I gave Dutch Focus.

HPIM1252_zps27db5084.jpg

Combat:
Roark boosted the CR90 to a 12. Primary attack, I spent the energy to roll a 5th die. I got 4 hits and a crit on Jonus, who rolled 2 evades. He pulled a Damaged Cockpit. Single Turbolasers also fired at Jonus. Rolled a crit and 3 blanks, but I spent the TL to get 2 more hits (with the ability of changing an eye to a hit). He rolled 2 evades again, and pulled a Direct Hit. Then my Aft QLC fired at the BH. 1 hit was evaded, then spent another energy to get 2 hits, which he didn't evade. (I forgot I had TL).

Then Wes shot at #1 Shadow (in front), 3 hits were evaded by spending his focus token.
Airen then shot at the Shadow, but it was evaded as well. Airen's free action went to the Dagger to get a TL on #1.

Brath then unloaded on Roark, getting 4 natural hits, which I evaded 1. Shield took one, then he spent focus to flip the other 2. DSA and Direct Hit.
Rhymer was too far away for a shot.
Jonus put one hit on Roark, who had to spend his focus to evade it.
Dutch put the first Ion on the BH.
Then the only Shadows with shots were the 2 by the BH. #1 got 1 hit (didn't have focus), which was evaded. #11 got 2 hits and a crit on Dagger, who got 1 evade.
Etahn did 1 hit and 1 crit to #1, who evaded 1, shield took the other.
Gamma put the last hit on Roark, but with Simultaneous fire, Roark desperately needed to put the second Ion on the BH, otherwise the BH drops a seismic on my entire squad next round. Roark succeeded without any tokens. His last dying shot saved the squad some serious damage.
The Dagger with Focus and TL, and Etahn's ability did 1 hit and 2 crits (spent TL) to Shadow #1, who didn't evade, so he was out.
The BH then put 2 hits and crit on dutch, who didn't evade.

So after the first round of combat, Roark and a Phantom were dead, and Jonus, now a PS0, was down to 1 hull left, and the BH was out of shields (2 QLC hits and 2 ion hits). Dutch was without shields, too.

I chose to target Jonus with the long range weapons because he was boosting 3 other ships. Taking him out first was much easier than trying to take all 3 of them out, and I almost succeeded in taking him out in the first round. Having Roark out hurt, because now the CR90 had to wait until PS4 to attack, and that was not gonna be easy.

Edited by hothie

Round 2:

Since Jonus had the Damaged Cockpit, he moved first, and did a 2 bank. the Gamma still had the TL on the CR90, so Jonus gave the Gamma a focus with Squad leader.

The BH was ioned, and with dutch in the way, he didn't move because he was based with Etahn. But the important thing was he wasn't able to drop his seismic charge, which was huge.

Gamma did a 2 right bank as well, which collided, but since he had TL and focus, it wasn't a big deal.

Dagger did a 1 fwd with focus, not knowing how far forward the Shadow was going to go.

#11 then did a 3 right bank, which was clear, so he barrel rolled to get a shot on the Dagger without getting shot back.

#31 did a 3 left bank with focus, #21 and 41 both decloaked forward and did a 3 turn with focus.

Etahn did a 4K to clear the BH.

Dutch did a 2 right turn and target locked Jonus. He then gave a TL to Airen Cracken.

Rhymer did a 2 right bank, which was clear, so he TL'd the Aft section.

Brath did a 1 right bank which collided.

Wes did a 1 fwd, which collided with the Shadow, and Airen did a 1 fwd and focus.

The CR90 did a 2 right bank, gained 2 energy, then spent Tibanna Gas Supplies to get to 5 energy. I allocated 2 energy to the Single Turbolasers, and 3 to the CR90. The Aft action was Toryn Farr, removing Rhymer's TL, while the fore's action was coordinate to give Dutch Focus.

The CR90 already had a TL on the BH, and I hadn't allocated energy to the forward or aft QLC (maybe I should have allocated to give to the fore, but didn't.) So coordinate seemed the best option there.

HPIM1254_zps25c92e87.jpg

HPIM1255_zps084a2b36.jpg

Combat:

Wes was based with #11, so he didn't have a shot.

Airen took the range 1 shot at #11, spent focus for 2 hits and a crit, with 1 evade, so #11 shields gone. The Dagger grabbed a TL on the Shadow with Airen's ability.

Brath put 4 hits on the CR90 Fore

Rhymer without his TL anymore, put 1 hit on Dutch, with 1 evade.

Dutch ioned Jonus, killing him.

#11 put 2 more hits on the Dagger, so it had 1 shield left. Then 21, 31, 41 took the CR90 fore section down to 2 hull left.

Etahn put 2 crits on the BH, who rolled 2 evades, which was clutch.

The Gamma then fired cluster missile at the CR90- crippling the fore section.

Simultaneous fire, though, the CR90 fore section Primary spent the energy for 5 dice and put 2 hits and 2 crits on the BH, with 2 evades.

Single Turbolaser then put 2 more crits and 2 hits on the BH, spending the TL and changing an eye to a hit with the weapon, BH rolled 0 evades and was killed.

Second Round casualties were Captain Jonus, the Bounty Hunter, and the CR90 fore section.

Third Round:

With the BH and Damaged Cockpit Jonus gone, the Gamma now moved first. It did a 2 fwd and TL the Aft section.

Dagger did a 2K.

#11 did a 1 turn, which didn't give it a shot on the dagger, so did a barrel roll for a range 1 unmodified shot.

#31 did a 3 right turn and Barrel roll right.

#41 did a 2 left bank and focus

#21 did a 4 fwd, and with all barrel roll options blocked, focused.

Etahn did a 1 fwd to clear stress, and since he didn't have a shot, or wasn't getting shot at, took a TL on brath.

Dutch did a 1 bank and collided with Gamma.

Rhymer did a 1 right bank and collided with gamma.

Brath did a 2 fwd with focus.

Wes did a 2 right turn, but collided with Etahn.

Airen did a 3 bank with a focus.

The CR90 did a 1 bank, running over #21, taking no damage in return. Aft gained 3 energy, allocated 2 to the QLC, and saved 1 for Toryn Farr. The action was Toryn Farr, which removed the TL off of the Gamma.

HPIM1256_zps3abb576e.jpg

Combat:

Wes shot first at Rexler, doing 1 hit and 1 crit, but Rexler rolled 2 evades. More importantly, though, Wes stripped Brath's focus token off.

Airen didn't have a shot.

Brath then did 2 hits on Dutch with 1 evade.

Rhymer blanked his attack.

Dutch then Ioned #31 with unmodified dice, setting him up to get run over next round.

31 then put 2 more hits on Dutch, who had 2 hull left.

41 spent focus to take the shields down on the aft section

#11 put a hit and 2 crits on the Dagger, which didn't evade. One of the crits was a Direct Hit, so the Dagger was out.

Etahn didn't have a shot.

Gamma put 2 more hits on the Aft section.

The CR90 primary, now at 2 dice, rolled blanks. The Aft QLC rolled 1 hit on #41, which was evaded, then spent another energy to get 2 hits with 1 evade, so 1 shield was taken off of #41.

Third Round Casualties were the Dagger and a Shadow that got run over.

Edited by hothie

Fourth Round:

Gamma did a 1 right bank with TL the Aft section.
#11 did a 2 fwd with focus
#31 was ioned and ran into rhymer
#41 did a 2 fwd and BR Left
Etahn did a 2 left turn and focus.

Ducth did a 2 left turn, barely missing the rock. He TL'd #11, and there was no recipient of his ability.

Rhymer did a 2 right bank and TL'd Etahn.
Brath did a 2 right bank and collided with rhymer.

Airen did a 3K.
Wes did a 3 bank and collided with Etahn, and was left on a rock. Rolled a hit for a shield damage.

CR90 did a 1 bank, running over #31, not taking a hit. 3 energy was gained, 2 allocated to the QLC, and 1 saved for Toryn Farr. Toryn Farr stripped Rhymer of his TL on Etahn.

(photo was taken after round 4 was complete.)

HPIM1257_zps4c2b3ad7.jpg

Combat:
Wes was on a rock, so didn't get to shoot, which was big.

Airen shot at #11, rolled blank and eye. Later we realized that Airen had a TL, so he allowed me to go back and spend the TL before the Shadow had shot yet. Airen rolled 1 hit, Shadow rolled 2 blanks, so it had 1 hull left.
Brath put 1 crit on Wes, who rolled 2 evades.
Rhymer put 3 hits with 2 evades on Wes, so his shields were down.

Dutch then Ioned #11 who rolled 2 more blanks on defense, killing it, which was huge.
41 didn't have a shot.

Etahn put 2 hits and 2 crits with Rexler spending focus for 2 evades, so Brath was down 2 shields.
Gamma put 1 more hit on the Aft Section. He couldn't use his Ion pulse missile because he was range 1, and wanted to save the tl for later.

The QLC put 2 hits with 1 evade on the Gamma, and the Primary didn't have a shot.

Fourth Round casualties was #31, who got run over due to being ioned the turn before.

Fifth Round:

This was where it got bad.

Gamma did a 5K off of the board, barely.

41 did a 2 right turn with focus

Etahn did a 3K
Dutch did a 2 right turn over the roid, and I think missed on the roll.
Rhymer did a 3 right turn, missing the asteroid and TL Dutch.

Brath did a 4k with focus.

Airen did a 2 fwd to clear stress, with focus.

Wes did a 4K.

CR90 did a 2 fwd, gained 3 energy, which was used to Recover 3 shields.

Combat:

Airen put a hit and 2 crits on Rhymer. One was Munitions Failure, I think, so he gave up the Ion Missile. Dutch took the Focus action with Airen's ability.
Wes put a hit and 2 crits on Rhymer with 1 evade. Neither of the crits was a direct hit, so rhymer was still alive, but Wes stripped his TL off.

Brath put 3 hits with 0 evades on Wes, killing him.

Rhymer then rolled blanks on his attack to finish off Dutch.
Dutch did a primary attack and killed Rhymer.

#41 spent focus for 3 hits and a crit on Etahn, who rolled 2 evades, so 2 shields gone off of etahn.

CR90 Primary rolled 2 crits at Rexler, who spent his focus for 2 evades.

Round 5 casualties were the Gamma that flew off, Wes, and Rhymer.

HPIM1258_zpsaf7c8f80.jpg

Round Six:

We were still way under time at this point, so we kept going.

41 did 2 fwd with focus
Etahn did 1 fwd with focus
Dutch did 2 fwd with TL on Brath, giving Airen a TL on Brath as well

Brath did a 3 bank onto the rock, which hit for his last shield.

Airen did a 3 bank with focus.

CR90 did a 1 bank and barely missed the rock. 3 energy was gained and allocated 2 for the QLC, and 1 for Toryn Farr, who stripped the focus off of the #41 Shadow.

Airen had no shot
Brath was on a rock, so no shot.

Dutch Ioned Brath, so he had 2 hull left.

#41 did 1 shield damage to the aft section.

Etahn finished off Brath, and we called it there.

HPIM1259_zps1f96ac15.jpg

Edited by hothie

So, lessons learned:

  • Toryn Farr was clutch for keeping the aft section alive, as well as the escort fighters. Definitely worth the points, and it is a card that we have never used in our group before, so it was a shockingly good surprise. Clutch, and the MVP of the game.
  • I used the Single Turbolasers twice, and got good results from them. But I can see why people don't want to spend the points on them. I had good rolls, with TL's and Etahn, so it worked for me. But with the fore section being targeted early, I only got to use them twice before they were gone, so I could see spending the points elsewhere.
  • I didn't use the Gunnery team, and with energy at a premium, I can see why others don't use it. I had the opportunity to use Gunnery Team once in round 2, but chose to use the TL instead. So I don't think I would use it again. I would find a better use for the points.
  • I also didn't use the QLC on the Fore section. Again, with energy at a premium, I think I had too many places for it to go, so I could have built the CR90 better with energy allocation in mind. But hey, it's my first time running the CR90, so I think it went ok.
  • Weapons Engineer and Sensor Team were both good, and useful.
  • I liked my set up and how I flew the CR90. I tried to keep it away from the fight first round, and it worked. I got 2 range 4 attacks off without getting shot back, and an AFT QLC shot as well on the BH, so I was happy with how I played the ranges in the first round.
  • I also tried to keep my CR90 from running over my own ships, and I did that. I kept it out of the way of my squad, but still had good attacks with it.
  • Again I go back to squad construction. My Rebel squad is very efficient, in terms of action economy, token stripping, Ion control, PS bid, good attacks, and well balanced. I liked how it worked together with the CR90, and the loss of any 1 escort ship still left me with decent synergy, so I liked the squad.
  • Etahn was key all game long, passing out so many crits it was ridiculous.

Well, it's pretty late, so I'm gonna cut it off for now. Hope you enjoyed it! :) It was a fun game, and I enjoyed playing the CR90 for my first time.

Edited by hothie

I really dug this write up, thank you. I tend to prefer knife fights, so I build my CR90 a bit differently, but yours makes a lot of sense.

One thing I did notice: a lack of ion weapons on the Imperial side. When going up against huge ships, you have a very small window to take them out, usually only 1 turn after the first bit of damage goes on it. Ion weapons extend this window pretty dramatically, forcing Huge ships to make bad trade offs.

Edited by Punning Pundit

I built your squads in Yet Another, if people want to play around a bit:

Rebel: http://goo.gl/l9Dhl5

Imperial: http://goo.gl/mtWDNE

And now that I've built your squads, I see you had ion missiles. So I'll be strike-texting some of my above comment.

Edited by Punning Pundit

I really dug this write up, thank you. I tend to prefer knife fights, so I build my CR90 a bit differently, but yours makes a lot of sense.

I think if I do it again, I might change out the Single Turbolasers and the Gunnery Team for a Bandit. I think I would have tried to run the Bandit towards the secondary weapon group and tried to block them, so they couldn't get TL's/Focus. Then get behind them and just pick at them if they don't kill it. That would put my CR90 at 119 pts, and give me better energy allocation while still having the primary and 2 QLC's.

Very nice and extremely detailed write up. I want to see more of this kind of thing in Our World.

Do you think Han Solo crew would have been useful for your CR90? I can't detach myself from using him in my Epic builds, especially since you're going with Sensor Team and Weapon Engineer.

Very nice and extremely detailed write up. I want to see more of this kind of thing in Our World.

Do you think Han Solo crew would have been useful for your CR90? I can't detach myself from using him in my Epic builds, especially since you're going with Sensor Team and Weapon Engineer.

Thank you, sir.

Um I could go with Han, but I would have to give up Toryn Farr to do that, and she was just so useful for the entirety of the game, that she is a tough one to give up. So I would have to give up the weapons engineer, which now reduces Han's effectiveness. So, I thiink for me, I go with the 2 crew I chose, unless you want the Tantive title, which would give up the Bandit.

Nice write-up. Makes me want to give epic a try!

I want to see more of this kind of thing in Our World.

The gaming store is closed this weekend for remodeling. So I may see if I can get another imperial epic player to come over (my teammate, and grasshopper.) I'll try my updated list against whatever he brings. Ill do another write up like this one.

Edited by hothie

Tantive title is the way to go to keep Torryn. Its secondary use is to keep 1 crew in the fore section despite being crippled in the case of your game example. At first, I was puzzled as to why a 4th team slot was useful when you can only field 3 unique ones for now. Its main use is a safeguard against the drawbacks of being totally crippled.

Tantive title is the way to go to keep Torryn. Its secondary use is to keep 1 crew in the fore section despite being crippled in the case of your game example. At first, I was puzzled as to why a 4th team slot was useful when you can only field 3 unique ones for now. Its main use is a safeguard against the drawbacks of being totally crippled.

Edit: so, from my original squad, I am looking at:

Drop single turbolasers and gunnery team, add in a Bandit.

Drop Sensor Jammer and drop dagger down to a blue, add in Tantive title and Han Solo crew.

How does that look?

Edited by hothie

Awesome write up! Very cool to see a CR90 doing good work. Looks like it was a pretty fun game!

Tantive title is the way to go to keep Torryn. Its secondary use is to keep 1 crew in the fore section despite being crippled in the case of your game example. At first, I was puzzled as to why a 4th team slot was useful when you can only field 3 unique ones for now. Its main use is a safeguard against the drawbacks of being totally crippled.

Ill look at it and see what I think. I may try it out, because not listening to Mu0n's Rebel advice is usually grounds for public shaming in a stockade.

Edit: so, from my original squad, I am looking at:

Drop single turbolasers and gunnery team, add in a Bandit.
Drop Sensor Jammer and drop dagger down to a blue, add in Tantive title and Han Solo crew.

How does that look?

Sounds pretty cool to me. Dropping gunny team is definitely a good choice, and a blocker would be great. I wonder if a Prototype pilot might be better in that role, since it can weasel in at PS1, and has better movement options for blocking. 3 points more for a blocker might be a little steep though. It's also a pity that the single turbo has to go, because with Han Solo crew it might make for some fairly effective long-range shooting.

Tantive title for Solo is also cool but I worry about the expense. The synergy with W.Eng and S.Team hopefully will make the investment worth it.

Edited by Babaganoosh

Oh man this is very cool. I haven't had anytime to read it while I'm busy plugging away at work. I can't wait until I get home so I do have time to look it over. It might sway me into buying my CR90 sooner than later :)

So, this game looked really one-sided.

What do you think went wrong on the Imperial side and would you make any list changes?

So, this game looked really one-sided.

What do you think went wrong on the Imperial side and would you make any list changes?

I like the Imperial list for its versatility. It's a list I made up, so maybe if he was playing a list he made up it might have been better for him? Maybe he just wasn't used to flying like I do. We did talk about it afterwards, and he could have set up and flown the Phantoms a little differently.

I guess I wouldn't have called that game one-sided. He probably rolled below average on defense, and I had good attacks, but my squad was built for action economy and taking away his tokens, so it was expected. He will chime in on this thread with his thoughts. I thought it was a fun game, and we both had a good time.

So, after looking at the squad, I think I'm going to split up the crew like this:

CR90-Fore

  • Quad Laser Cannons
  • Sensor Team
  • Weapons Engineer
  • Toryn farr
  • Tantive IV title

CR90-Aft

  • Quad Laser Cannons
  • Han Solo
  • Tibanna Gas Supplies

The reasons being, if the Fore section gets taken out first, I can still take an action with it, being Toryn Farr. I would give up the WE and the QLC, but still keep the Sensor Team, although Sensor team would only matter if Dutch is still on the board and within range. I can give up the WE because i wouldn't be able to TL anyway, again, unless Dutch blah blah blah. Plus I would still be able to use Han (on the aft section) if I did have TL's on the board. If the Aft section gets taken out first, I can still TL twice with the WE, and I would still have 2 good weapons left. Plus, I found in my game with SimonSays3 that I would rather have Toryn on the front half most of the time anyway, because that was where most of the enemies were.

Round 2 in my game, I could have given up the coordinate action for Toryn farr, and I think been better off.

Since Hothie already did a fantastic job detailing the play-by-play of our game, I'll weigh in with some general thoughts and areas of improvement for future epic games. As noted, Hothie had put together both lists, giving me his very successful imperial squad to pit against an untested Rebel list with a huge ship. Not using a list of my own certainly had an impact on the game but that was due far more to my unfamiliarity with certain ships than any weaknesses of the squad. If you ever get the chance to fly 5 phantoms, I guarantee you won't regret it :)

General

-Pilot skill was incredibly important in this game, especially with Hothie's beautiful synergy list. The more Epic games we play, the more I'm appreciating just how valuable it is to shoot first when you're running around a dozen ships. The 10 points spent on upgrading the Sigmas to Shadows was big and gave me some seriously powerful shots before the CR90

-Conversely, large group formations can still be disrupted by a single ship mucking up your entire maneuver phase. A large based ship with boost can cover huge distances in epic and since the sheer volume of ships requires some serious concentration of fire, anything that can split that up is incredibly important

-Action denial with Toryn Farr and Wes Janson was the key to really neutering my bombers. During the whole game I only managed to launch a single salvo of cluster missiles. Watching all that expensive ordinance go up in smoke definitely hurt

-Rexler Brath simply cannot be ignored in an epic game. He's too tough and too well armed (especially with a heavy laser cannon) to be left in the end game and until I got him stuck on a rock, I still had a reasonable chance to deal some serious damage

-Squad timing is key, especially when you have a large group of ships. While my setup needed some adjusting (more on that below), having each element hit when you need it to can make a big difference in terms of effectiveness. Once they're in the furball it's less crucial but controlling your approach will be the element that really separates the good epic players from the....well, the ones more like me ;)

-The above includes asteroid placement. The player with the huge ship plays a big part in deciding where the engagement will take place and it's up to you to build the battlefield with that in mind. Huge ships really don't like running over asteroids (free crits and all) and you can use that to your advantage

-If you don't have a huge ship, weight of numbers (an imperial strength) should really be in your favor. Your opponent is paying a premium for that fancy, multigun beast. Make their targeting priority messy and you'll be happier for it

Improvements

-Overall, I used my phantoms very poorly. While setting up my BH in a flanking position was an excellent way to slow down his escorts, I should have placed my phantoms all together and swept in with 20 guns blazing. Just 3 did massive damage to the CR90's fore while my other 2 hardly scratched the paint on a b-wing before going up in a blaze of glory. I personally need more practice with generic phantoms (there's a lot of potential there) but I misjudged my post assault and got one run over while the others were out of position to attack. I also only used their cloak to reposition once - Hothie and I both agreed that the 1 turn combined with cloak would have given me space to really put the hurt on the CR90 while the rest of his squad was dealing with my BH and Shadows

-As noted, Hothie did a great job keeping my bombers locked down - I should have slow-rolled them up the center so that by the time we were ready to engage, he would have been dealing with the full force, versus just one or two striking from range 3

-With all of that space, I should have been able to keep my actions. However, placing my ships too close together led to bumping which coupled with Toryn pulling off tokens left and right, really took the teeth out of my attacks. I need more practice with formation flying (too much time with interceptors ha!), since I had far too many focus results in want of a token

-And in case it wasn't obvious, running a Gamma off the edge of the map doesn't do much to help your odd :D

So, in summary, the basics of x-wing (good setup, action economy, and timing) still apply in epic and tend to be more pronounced with greater number of ships on the field. It is important to note that despite the clear mistakes made on my end, this was still a fairly close game until round 5 - more ships can make the game more forgiving and having Brath around that far in the game made a difference in targeting priority.

As always, fly casual, learn from your mistakes and have fun! Running around a field with a whole ton of ships is still awesome and anyone who says the CR90 is a waste of points should spend some time staring down the barrel of 4 separate attacks two rounds in a row :)

Thanks Hothie for the great write up and the excellent game - our rematch will be legendary! Or at least fun....

So, I played a game today against my epic teammate and grasshopper. I brought:

CR90-Fore
Tantive IV title
Gunnery Team
Weapons Engineer
Toryn Farr
Quad Laser cannons

CR90-Aft
Han Solo
Quad laser Cannons
Tibanna Gas Supplies

total-125

Wes Janson with Veteran Instincts
Airen Cracken with Veteran Instincts
Dutch Vander with Ion Cannon
Etahn Abaht

Roark Garnet with Ion Cannon

Blue with HLC
Bandit Squadron Pilot

He brought 14 ships:

5X Academy Pilots
3XAvenger Squadron Pilots
3XGamma with Cluster Missiles, Proton Torps, and Seismic Charges

2XStorm Squadron Pilots with Cluster Missiles

Colonel Jendon with HLC, Sensor Jammer, Anti-pursuit Lasers, ST-321

I didn't take as many pics or keep track like I did for Wednesday's game. Sorry about that.

His strategy was to ignore the CR90 and focus on my support ships, then hopefully have enough left to take the CR90 down.

I proved that you can't ignore the CR90, even when you start with 14 ships.

The game went to time, and I won on points, because my 125 point CR90 was untouched, and Airen was left vs his Jendon, 1 Storm, 1 Gamma, and 2 AP's. At time, all of his ships were either pointed in the wrong direction, or on a rock, so he wouldn't have done much after that. We played the next round, and the CR90 took the Gamma out, and Jendon was down to 1 hull left with a Minor Hull Breach, and stressed, so his combat time was over.

We talked afterwards, and the asteroid placement and set up was very much key to the game. He had to scrap his initial plan because he risked getting bowled over by the CR90 if he tried to joust with it, and the asteroids were detrimental to his flight plan of trying to take on the support ships. He did take out Roark first, just like Simonsays3 did on Wednesday.

It was a good game, but now I'm 3-0 with a CR90 against Imperial squads, so it can be done. (Played an epic game last night as well, against another Imperial Squad.) I go back to the keys being:

  • squad construction
  • asteroid placement
  • set up
  • and execution

If I had to change anything about my squad, I would take out the Tantive IV title and Han (sorry, Mu0n, I tried,) and put in Slicer tools on the Aft half, because it is a fantastic deterrent, and I didn't need the aft actions much in the 2 games I played this list. And both games I had energy to burn as well. I would also think harder about where to put Toryn Farr, because I needed the fore actions for TL, so she didn't get as much use, although she was key in one turn this game, stripping 3 ships of TL, one of which being Jendon. :)

So, I can now say that winning with a CR90 can be done against a myriad of different Imperial lists. But for now, it's back to Imperials for me!!!!

Edited by hothie

Excellent Epic play. I do enjoy Epic. But I still prefer my Doom Transport. just need to find a better way to protect it.

So, I played game #4 with the CR90, again against a different player with a different Imperial squad. My squad:

CR90 Fore (63)

  • Quad laser Cannons
  • Sensor Team
  • Weapons Engineer

CR90 Aft (56)

  • Quad Laser Cannons
  • Toryn farr
  • Tibanna gas Supplies

Wes Janson with Veteran Instincts

Airen Cracken with Veteran Instincts

Dutch Vander with Ion Cannon turret and R2 Astromech

Etahn Abaht with Sensor jammer

Roark Garnet with Ion cannon Turret and Nien Nunb

Blue with HLC

Bandit

His Squad:

Whisper with ACD, Gunner, Vet Instincts, and Fire Control System

Vader with Engine Upgrade and Proton Rockets

Howlrunner with Swarm tactics

Rexler Brath with HLC and Engine Upgrade

Colonel Vessery with HLC and Engine

Captain Jonus with Squad Leader and Seismic Charges

Colonel Jendon with ST-321, Weapons Engineer, and Advanced Sensors

X3 Black Squadron Pilots

Asteroid and set up:

he won init, so he put out the first rocks:

f8da6199-3e9a-44db-983e-55fb33091c88_zps

He chose the 2 big rocks, and put them in the middle of the board. I wasn't planning on going into there much anyway, so i didn't mind these being there. Then I placed 2:

f64d4f9f-4fe4-48e8-82be-2704d509977c_zps

I wanted these 2 to block the path to the aft end of my CR90 in case I set up on the right side.

32c8c5a0-22ed-42be-85b9-8772ac0c216e_zps

He set these up in the middle, which I wasn't too worried about. They mainly just serve to block his way in to my force.

831ec54e-f83d-49f5-acd6-f918bc067780_zps

These served the same purpose as the first 2 i placed. These blocked the way in if I set up on the left side, which was looking more likely by this time.

249993a7-1e52-4be7-b026-f424eb0dc3de_zps

He set these up on my right side, which all but sealed that I was setting up on my left side. I had left a lot of room to maneuver around on my left side, so I knew that was where I was going to be.

0c97f9c8-0699-4f5d-acf4-ef0ce98efed0_zps

So I set these up to block his way in to my area, and to keep my maneuvering options open.

Set up:

558ec08e-8041-4ac6-b080-65487d7dad0f_zps

I did my normal set up. He split the HLC's in the middle, the TIEs on his left in one group, and the Phantom by itself.

2014-09-14083901_zps70966df2.jpg

So I set up Roark and Etahn behind Dutch, which kinda came back to bite me a little. I could have set up better, with PS and abilities in mind better.

2014-09-14083912_zps562fa8c0.jpg

His TIEs on the left side were blocked a little by my last set of asteroids, so they had to delay for a round to get to the CR90.

First Round:

My entire squad went 3 forward with focus, with Airen and Wes both going 4 forward to go after Whisper.

One of his Blacks went 3 bank, while the other 2 went 2 bank. Vessery and Jonus each went 2 forward with focus, Jendon did a Advanced Sensor Target lock of the Blue and Bandit before going 1 forward, Rexler did a 2 forward with focus, Howl did a 2 bank with focus, Whisper did a 2 forward with Cloak, and Vader did a 3 forward with boost and focus.

the CR90 did a 2 forward, allocated energy to both QLC's. Forward action was to coordinate with Dutch, giving himself and the Blue TL's, and the Aft action was to Reinforce the forward section.

2014-09-14085218_zps82a8f244.jpg

Combat:

Jendon passed the TL on the Blue to Rexler, and Roark made the Blue a PS12. Blue fired HLC at Brath, spending focus for 4 hits, Brath spent focus to take 2 hits. Then Airen fired at Whisper, rolling 2 blanks, but giving a TL to Wes. Wes spent his TL for 2 crits and a hit on Whisper, who rolled 2 natural evades, so was down 1 shield. Vader's shot at the Blue was evaded, but Rexler's HLC shot put 4 hits on the Blue with 1 evade, so down 3 shields. Vessery spent his free TL on the Blue to get 2 hits and a crit on the Blue, all of it got through. Crit was Thrust Control. Jonus put 1 more hit on the Blue. Dutch put 1 crit and 1 hit on Rexler, who rolled 0 evades. Crit was Minor Explosion, which didn't hit. Roark missed his 1v4 at Rexler. The CR90 rolled 2 crits at Rexler, with 2 evades, and the Bandit put 2 hits on Rexler, with 2 evades.

So at the end of the first round, all ships were still on the board. Blue was down to 1 hull, Rexler was down to 2 hull, and Whisper was down a shield.

Round 2:

Blue was stressed due to Thrust control, so he did a 1 right bank with focus. Bandit did a 3 right bank to pull up next to the blue, with focus. His Blacks each did 3 forward with focus. Roark did a 2 right bank with focus. Etahn did 2 right bank, which collided into Roark.

Vessery did a 3 forward with focus. Jonus did a 2 left bank with focus, jendon used Advanced Sensors to TL the Blue and the aft CR90, then did a 2 forward which collided. Dutch did a 2 right turn which collided as well. Howlrunner did a 3 forward with focus, Brath did a 2 forward, which collided into my Bandit. Vader did a 1 right bank, with a boost right and focus. Whisper decloaked forward, then did a 3 left turn, which collided with Wes.

Airen did a 3 turn, barely missing an asteroid, with focus, and Wes did a 4k turn to have a good arc on the Phantom.

CR90 did a 1 left bank, which ran over Vader (no damage), gained 3 energy which I didn't need to allocate, since I didn't use my QLC's in the first round. Fore action was target lock onto Vessery and Howlrunner. Aft action was to Reinforce the forward section.

(picture taken after second round was complete)

2014-09-14093502_zps9a13cd30.jpg

Combat:

Jendon passed a TL to Vessery, and Roark made the Blue a PS12 again. Blue spent his TL to finish off Brath. Airen rolled 2 hits with 1 evade at Vessery. Airen's free action went to Dutch, who acquired a TL on Whisper, allowing Wes to do the same. Wes then spent his Tl for 2 crits and a hit on Whisper, who didn't evade, so Whisper was out. Howl then finished off the Blue, spending focus to do so. Jendon put 2 crits and a hit on the bandit, who spent focus for 2 evades. jonus rolled 2 blanks, vessery put 4 hits on the fore section, with Jonus reroll. Fore section was reinforced to only take 3. Dutch took out 2 of Jendon's shields. Etahn put a Minor Hull Breach on Jonus. Blacks only managed to get 1 hit through the Reinforced Fore section. Roark ioned Vessery. CR90 Primary rolled 2 crits and 2 hits at Howl, who rolled 1 evade, so howl was out. neither QLC had a shot. Bandit's shot was evaded.

So second round casualties were: Blue, Vader, Whisper, Rexler, and Howlrunner.