Interesting idea with the alcohol or windex,,, never heard of that before.. and I've been painting for 40+ years.. lol.. thanks for that, I love learning something new.
How easy is it to repaint?
I'd love to do some repaints (I've painted various other miniatures for the last 15 years and LOVE it), but I am terrified of damaging the frail models during the stripping process. I'm sure they are tougher than I give them credit for, but I still find myself handling them like they are made of glass...
but I am terrified of damaging the frail models during the stripping process.
Unless you're planing on doing a fairly major repaint, you really don't need to strip the mini first.
but I am terrified of damaging the frail models during the stripping process.
Unless you're planing on doing a fairly major repaint, you really don't need to strip the mini first.
Nothing too wild, just want to swap out the red on one of my Xwings to a blue color, and possibly swap the red on an A-Wing for a nice green.
As someone who has both stripped, painted over, and airbrushed a new base coat, there is absolutely no reason to strip the models. If you're doing a major repaint, I would suggest air brushing a new base coat on, but I don't see any reason to strip a model.
But if you're going to avoid advice to not strip, the best soluvent I've found is actually brake fluid. Though I would recommend breaking off the peg because it makes the peg smoky and yucky looking. But at the same time, I don't recommend breaking off the peg because it doesn't seem to hold as well when reglued as it did from the factory.
but I am terrified of damaging the frail models during the stripping process.
Unless you're planing on doing a fairly major repaint, you really don't need to strip the mini first.
Nothing too wild, just want to swap out the red on one of my Xwings to a blue color, and possibly swap the red on an A-Wing for a nice green.
The Green is what I was referring to as what I've painted over. It works just fine. Though it does look a bit silly to have all of your Green A wings have the same panel painted green so I'd suggest painting over that with white on some of them and painting other random panels green if you like that effect.
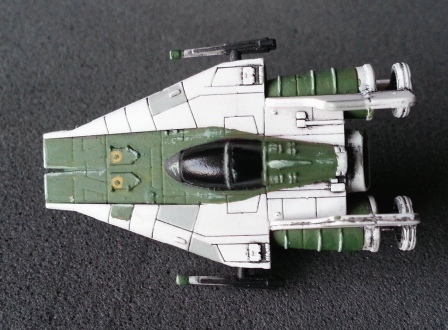
I was hoping for an end product similar to this:
I think I'm just going to sit back and let you all talk. You're covering a lot of my concerns:
Bit of dry brushing after a wash to get a more dramatic and clean effect. Because I don't want them too dark.
Don't have to strip before repainting ![]() The model not me.....unless I want to that is.
The model not me.....unless I want to that is.
Those were two more things I was going to inquire about.
Keep all these good tips coming.
Edited by Tamati KhanNothing too wild, just want to swap out the red on one of my Xwings to a blue color, and possibly swap the red on an A-Wing for a nice green.
Yeah wouldn't bother stripping them for that, just might need to paint on another coat to get the color right and all.
Especially for the X-Wing since you're really only painting the trim anyway.
So far I haven't touched a single one of my mini's with a brush, but this thread is making me consider it...
I've pained 1750 points of space marines, 2 full armies for Flames of War and a Warmachine list, so I'm pretty handy with a brush, just never felt the need to touch up my X-Wing stuff. But different trip and stripes on the X-Wings might be nice.
Also been meaning put a blood stripe on my Interceptors for a while now.
When I do layers, for chipping effects and wear marks, I go in order.
On a bare model:
Primer
Enamel
Acrylic
Oil
Water
At every layer I will mask areas with tape or silly putty(if the surface has a lot of fine details). Then add my next layer and so on.
Like most have already stated before; with these finer models you will want to thin your paint to retain the details.
As always, I suggest before painting, knocking back a cold one. It helps steady your hand to get nice and straight lines.
As always, I suggest before painting, knocking back a cold one. It helps steady your hand to get nice and straight lines.
Confirmed ;D
Paneling is a nice effective way to keep the initial wash intact. Paint around the existing dark lines and do your best to avoid filling them in with whatever colour you choose.
Seems some of the ships have more wash or inks done to them. I'm just going over my A-Wings now and the parts you'd be painting green have no wash applied to the area at all. Should make it easier.
just as a warning to those who want to strip the old paint off, be careful what stuff you use for that.
I have seen an image of a x-wing floating around, which didn't really survive the process.
It did look like you put Icarus on the pilot seat and let him do his usual thing. ![]()
I haven't tried stripping any of the small ships. I did strip a Firespray with brake fluid though. Worked fine, no problems at all.
So I was thinking about redoing my HWK. Would a black spray base coat, with a white dry brush effect come out okay? (Might go a little heavier than 'dry')
I've only painted a few minis for DnD stuff, but never anything plastic.
If you're going to be spraying, I would suggest going with a dark gray and a medium gray. Spray them in a fashion where both show in areas. This can be done by masking off areas and doing a camo effect or by diluting the paint so it still shows the previous paint below.
By going with grays instead of blacks will make the ship look better at the end of the day, and going with two colors will make it even less uniform when you go ahead with the white dry brushing. Again, I would recommend brushing with multiple colors to keep it from being so uniform, a camel and an off white would probably work well.
So then the end result would be a ship that looks dirty and non-uniform, which is very important to not making it look like a toy.
Expanding on what Kyros said, there are two colors you should always avoid: pure white and pure black.
That isn't to say you can't have white and black ships, but instead of being pure white or black it should be very dark grey or a very, VERY light color (usually a light "brown" e.g. parchment, or a light "blue" for ice effects).
The problem with black and white is you have no where else to go from there. You can't drybrush white lighter, and you can't wash black darker. You are stuck with a flat color that is very toy-like in appearance.
And typically your eyes will interpret very dark grey or very light colors as pure black or white anyways.
So do most of your model in a color just a few shades off of what you want, then wash/drubrysh, and you will have a ship that LOOKS like the color you want, but still benefits from the added depth you can achieve with drybrushing/highlighting.
Oh, there is one other color you need to be careful with: RED. Specifically, very bright reds e.g. 100% saturated red, a very popular color.
How do you highlight red? What do we call a lighter color than red? PINK. Which in turn makes the whole model look washed out and pink, which is usually not the effect anyone is going for.
So here is two tips for doing bright red ships:
1) Always use a more moderate, darker red as a base, then highlight/drybrush with the bright red you actually want the ship to look like.
2) if you want to highlight brighter than pure, 100% saturated red, mix with yellow or orange, not white. The highlighting spectrum from red to white leads you through pink territory. But mixing with yellow leads you through orange. It's much better for highlighting red.
This is probably a little deeper than most people will be going when painting these models, but if you DO want to achieve some of the more impressive painting effects, it's done with highlighting and washing, and there are a lot of little gotcha's you can run into when trying to achieve depth on a model.
Is there a trick to making a colour look metallic? Or are there metallic coloured paints for use with models?
Uh oh, one of the colours I wanted to do was metallic red
Edited by Tamati KhanPainting metallics is a WHOLE other topic that has it's own technique to it, and any colored metal is going to take some special care. Here's my thoughts for metallic red:
There are three ways you could go about it:
1) use a metallic paints in the correct color, though usually steel and gold is well represented. So you could add red dye (DYE, not PAINT. Big difference here) to a series of steel colors. There is a trick to making metallic paints look good though, you don't want to just use a single color. Your basic steps are to: put down a dark metallic color (dark steel), highlight with a brighter one (regular steel), wash with a black wash, re-highlight with your brighter color (regular steel), and then dry brush or highlight with a bright steel (silver or mithril).
2) Natural metal finish (NMF) with a dye. Basically, you use some sort of NMF finishing solution and put a coat of colored dye over it to tint it. There are several great natural metal finishes out there, ranging from "polishing" powders to spray on effects. Polishing powders are pretty great because they can be weathered and died afterwards, but can be hard to find. Spray on effects can also be great and easy, but some of them can't handle things like washes and inking because it ruins the finish. You would have to do some research. Just search for natural metal finish or NMF paints online.
3) Non-metallic metal (NMM). The hardest to do, best looking, and cheapest of the three. It takes some skill to accomplish but looks amazing when you can pull it off, and you don't need any special products; it just uses regular paint. Basically, it's a technique where you paint reflections and tonal shifts directly onto the mini to simulate metal. It takes some skill to master, but the results are pretty stunning when you get it down. Here's a basic tutorial. You can see the end result actually looks MORE like metal than a metallic paint would, because even great metal finishes still don't reflect light the same way a full sized object would. Just do a Google Image Search for NMM miniatures and you will see tons of amazing examples.
Obviously way better than most of us could achieve even with practice, but check out this amazing NMM finish. No fancy paints, no actual reflections or gloss coat, just clever combinations of blue, white, black, and brown paints.

Might stay away from metallic then. Just stick with the red and blue for my Firespray and some dark green for the YT-1300.
Obviously way better than most of us could achieve even with practice, but check out this amazing NMM finish. No fancy paints, no actual reflections or gloss coat, just clever combinations of blue, white, black, and brown paints.
Grimlock, king of the dino-bots!
Thanks for the tips guys, now to just actually be motivate enough to do it...